
:max_bytes(150000):strip_icc():format(webp)/duet-c82ee94b39e24788bcfd51d1eea24288.jpg)
"2024 Approved Navigating the Digital Realm Uploading with Premiere & YouTube"
Navigating the Digital Realm: Uploading with Premiere & YouTube
How Do I Use Adobe Premiere To Upload YouTube Videos?

Benjamin Arango
Mar 27, 2024• Proven solutions
Whilst getting the editing and post work just right on any project is what we all aim for, the ultimate aim is for other people to see our creations, and the most popular way to achieve that is YouTube . Chances are, if you are producing video, you will be putting some of it on YouTube at some point, so let’s have a look at the most efficient way to get your work from Premiere to YouTube.
Check if your computer meet the Premiere System Requirements >>
This is a basic tutorial about Adobe Premiere, professional video editing software. However, if video editing is new to you, consider Wondershare Filmora , which is a powerful but easy-to-use tool for users just starting out. Download the free trial version below.
 Download Mac Version ](https://tools.techidaily.com/wondershare/filmora/download/ )
How Do I Use Adobe Premiere To Upload YouTube Videos
1. Master Copy
Before exporting your work, it is important to first create a master copy of your project that is ‘as is’, in that it reflects the settings and codecs used in the original footage.
To do this you simply select the sequence within the Timeline or in the Project Panel, and go through the menu tree via File > Export > Media to bring up the export dialogue.

To create your Master Copy, simply select the first option of ‘Match Sequence Settings’, this exports a file that is of the same quality as your original footage, essentially producing a digital copy of the work for archiving before anything else is done.
With you work safe and secure it is now time to look at ensuring the project is suitable for YouTube. With our sequence selected in the Timeline or Project Panel again, we go through the same File > Export > Media path to bring up the media export dialogue as before.
2. Container
The first option we have to consider is the file format that our finished video needs to be in. Here you should refer to YouTube for its guidelines, whilst they do accept a number of file formats, digging through the YouTube help system to find the settings for highest quality we find that they recommend MPEG4 as the container, using the codec.

We can also see further recommended settings in this screenshot that will be covered later.
The good news is that Premiere automatically selects the appropriate container for us when we select our codec, however it is worth knowing the file type YouTube is expecting just to check yourself.
3. Video Codec
So having established that YouTube recommends the MPEG4 container using the codec, the first option we need to look for in the media export dialogue is to select the appropriate Format.
This is the first drop down in the dialogue box, and in this case we simply select from the list.

Once you select you can check the ‘output name’ field and see that premiere is automatically set the output file to .mp4 which is exactly what we need.
4. Preset
The next field we come to is the ‘Preset’ dropdown menu. This is a major help to most people, as Adobe have very kindly included large numbers of presets to quickly adapt video settings to suit specific uses. They vary depending on the exact version of Premiere you are using, and each format type does have its own list of presets, as we can see has a large number for YouTube, but also has many presets for specific devices (presets for iPad, Kindle, Nook, various other tablets and phones, Vimeo and a host of others) to make getting the right settings that bit easier for us.

It is important here to select the correct preset from the various YouTube options. You want to select the resolution and frame rate that match your source file, for the best results. So, if your source file is 1080p with a frame rate of 29.97 fps then that is the YouTube setting you would select.
Once a preset is selected a summary of the settings is displayed below, normally these will be well suited to your project, however you can fine tune anything you wish by selecting the video or audio tabs at the bottom which give you the chance to adjust each parameter individually. If you do this, you can save these changes as a custom preset by clicking the button at the side of the Preset dropdown menu and simply use it on later projects by selecting it from the list the same as any other, a great time saving tool.

5. Rendering
Once you are satisfied with the settings, either from the Preset alone or if you have adjusted anything yourself, you are nearly ready to render the file and export it.
For YouTube it is recommended you select the ‘Use Maximum Render Quality’ option to maintain the best output you can, it does add time to the render process but if you value the quality of your work it is worthwhile.
Finally you can choose a suitable filename and the destination of the file by clicking on the ‘Output Name’ field.
I normally use a filename that includes the destination medium so I can differentiate between different versions of a project and know which one to upload where, in this case I include ‘youtube’, but if I were planning on uploading clips of the project to vimeo as well for instance there may be a cut of the project with ‘vimeo’ in the name too. The destination is personal preference, because I do use filenames to differentiate versions I can put the various iterations into a single project file, others have folder structures for each type of file , so all YouTube output goes into a single folder and so on, how you organize is entirely dependent on how you work.

Once those are selected clicking ‘Export’ starts the rendering process, and eventually (how long depends on the speed of your computer and the size and type of file involved), you will end up with your YouTube optimized video in the location you chose.
Here I created 4 key frames that let the ‘Animation’ object move around the ‘Demo Text’ Object and finally come to rest below it. Whilst this type of effect does look very effective on screen, such is the ease of use of After Effects it really is just a few minutes work to achieve.
Learn more details about How to add text in Premiere >>
6. Uploading
Now you have your file, the next step is to go to your YouTube account and log in if you need to.
On the top of your homepage on the right is the upload button, selecting that brings up the select file menu as below.

You can either drag your file into the window or click on it to open a standard file browser to locate the desired file, click and the upload will begin. The dropdown underneath allows you to set the video as Public, Unlisted or Private. You can change this at any time once the video is uploaded as well.
This opens the upload progress window, where you can add in a name, description and tags as well as add the video to a playlist or adjust the privacy settings as the video is uploading.

Once the upload as finished, you can do final adjustments to settings and choose a thumbnail for the video. The final step is to click the ‘Publish’ button and your video will be processed and go live.

Benjamin Arango
Benjamin Arango is a writer and a lover of all things video.
Follow @Benjamin Arango
Benjamin Arango
Mar 27, 2024• Proven solutions
Whilst getting the editing and post work just right on any project is what we all aim for, the ultimate aim is for other people to see our creations, and the most popular way to achieve that is YouTube . Chances are, if you are producing video, you will be putting some of it on YouTube at some point, so let’s have a look at the most efficient way to get your work from Premiere to YouTube.
Check if your computer meet the Premiere System Requirements >>
This is a basic tutorial about Adobe Premiere, professional video editing software. However, if video editing is new to you, consider Wondershare Filmora , which is a powerful but easy-to-use tool for users just starting out. Download the free trial version below.
Download Mac Version ](https://tools.techidaily.com/wondershare/filmora/download/ )
How Do I Use Adobe Premiere To Upload YouTube Videos
1. Master Copy
Before exporting your work, it is important to first create a master copy of your project that is ‘as is’, in that it reflects the settings and codecs used in the original footage.
To do this you simply select the sequence within the Timeline or in the Project Panel, and go through the menu tree via File > Export > Media to bring up the export dialogue.
To create your Master Copy, simply select the first option of ‘Match Sequence Settings’, this exports a file that is of the same quality as your original footage, essentially producing a digital copy of the work for archiving before anything else is done.
With you work safe and secure it is now time to look at ensuring the project is suitable for YouTube. With our sequence selected in the Timeline or Project Panel again, we go through the same File > Export > Media path to bring up the media export dialogue as before.
2. Container
The first option we have to consider is the file format that our finished video needs to be in. Here you should refer to YouTube for its guidelines, whilst they do accept a number of file formats, digging through the YouTube help system to find the settings for highest quality we find that they recommend MPEG4 as the container, using the codec.
We can also see further recommended settings in this screenshot that will be covered later.
The good news is that Premiere automatically selects the appropriate container for us when we select our codec, however it is worth knowing the file type YouTube is expecting just to check yourself.
3. Video Codec
So having established that YouTube recommends the MPEG4 container using the codec, the first option we need to look for in the media export dialogue is to select the appropriate Format.
This is the first drop down in the dialogue box, and in this case we simply select from the list.
Once you select you can check the ‘output name’ field and see that premiere is automatically set the output file to .mp4 which is exactly what we need.
4. Preset
The next field we come to is the ‘Preset’ dropdown menu. This is a major help to most people, as Adobe have very kindly included large numbers of presets to quickly adapt video settings to suit specific uses. They vary depending on the exact version of Premiere you are using, and each format type does have its own list of presets, as we can see has a large number for YouTube, but also has many presets for specific devices (presets for iPad, Kindle, Nook, various other tablets and phones, Vimeo and a host of others) to make getting the right settings that bit easier for us.
It is important here to select the correct preset from the various YouTube options. You want to select the resolution and frame rate that match your source file, for the best results. So, if your source file is 1080p with a frame rate of 29.97 fps then that is the YouTube setting you would select.
Once a preset is selected a summary of the settings is displayed below, normally these will be well suited to your project, however you can fine tune anything you wish by selecting the video or audio tabs at the bottom which give you the chance to adjust each parameter individually. If you do this, you can save these changes as a custom preset by clicking the button at the side of the Preset dropdown menu and simply use it on later projects by selecting it from the list the same as any other, a great time saving tool.
5. Rendering
Once you are satisfied with the settings, either from the Preset alone or if you have adjusted anything yourself, you are nearly ready to render the file and export it.
For YouTube it is recommended you select the ‘Use Maximum Render Quality’ option to maintain the best output you can, it does add time to the render process but if you value the quality of your work it is worthwhile.
Finally you can choose a suitable filename and the destination of the file by clicking on the ‘Output Name’ field.
I normally use a filename that includes the destination medium so I can differentiate between different versions of a project and know which one to upload where, in this case I include ‘youtube’, but if I were planning on uploading clips of the project to vimeo as well for instance there may be a cut of the project with ‘vimeo’ in the name too. The destination is personal preference, because I do use filenames to differentiate versions I can put the various iterations into a single project file, others have folder structures for each type of file , so all YouTube output goes into a single folder and so on, how you organize is entirely dependent on how you work.
Once those are selected clicking ‘Export’ starts the rendering process, and eventually (how long depends on the speed of your computer and the size and type of file involved), you will end up with your YouTube optimized video in the location you chose.
Here I created 4 key frames that let the ‘Animation’ object move around the ‘Demo Text’ Object and finally come to rest below it. Whilst this type of effect does look very effective on screen, such is the ease of use of After Effects it really is just a few minutes work to achieve.
Learn more details about How to add text in Premiere >>
6. Uploading
Now you have your file, the next step is to go to your YouTube account and log in if you need to.
On the top of your homepage on the right is the upload button, selecting that brings up the select file menu as below.
You can either drag your file into the window or click on it to open a standard file browser to locate the desired file, click and the upload will begin. The dropdown underneath allows you to set the video as Public, Unlisted or Private. You can change this at any time once the video is uploaded as well.
This opens the upload progress window, where you can add in a name, description and tags as well as add the video to a playlist or adjust the privacy settings as the video is uploading.
Once the upload as finished, you can do final adjustments to settings and choose a thumbnail for the video. The final step is to click the ‘Publish’ button and your video will be processed and go live.
Benjamin Arango
Benjamin Arango is a writer and a lover of all things video.
Follow @Benjamin Arango
Exploring the Vault of Fame: Top 10 YouTube Giants by Views
Create High-Quality Video - Wondershare Filmora
An easy and powerful YouTube video editor
Numerous video and audio effects to choose from
Detailed tutorials provided by the official channel
It is that time of the year when everyone is jostling for creators who made it on YouTube. Being a popular streaming service with over 2 billion monthly viewers, YouTube fans are far attached to the proceedings and improvements of YouTube. More so, it’s the place where you get any content, no matter what interests you, from podcasts, videos, music, vlogs, and other tutorials. And you must be eager to meet the biggest YouTuber in the world among other well-rated creators. Well, we have compiled a complete list of 10 creators with the most subscribers. Dive in for more!
In this article
01 Top 10 YouTubers with the Most Subscribers in 2024
02 What are the similarities of the top 10 YouTubers listed above?
03 Additional thoughts - the importance of a well-made video
Top 10 YouTubers with the Most Subscribers in 2024
Check out the YouTubers who scaled the heights in 2024.
1) T-Series

The top on our list is T-Series. This group is led by the Great Visionary, Sh. Gulshan Kumar, whose focus has been on offering quality content to viewers. This is a film production company from India and has been at the forefront of giving constant entertainment. From its 30 years of existence, the group has potentially grown to own 166 million subscribers worldwide.
2) Felix Arvid PewDiePie

Among the most subs on YouTube is PweDiePie that has been at the forefront for quite some time but was recently pushed to the second position. He dwells on hilarious meme videos, cracking your ribs and kicking that chilly feeling out of you. The Swedish YouTuber has reached the 102 million subscriber mark. He is regarded as an influencer due to his entertaining personality. Check out some of his works and subscribe to his channel for more updates as well.
3) Cocomelon

Cocomelon knows how to keep you locked in with his 3D animation videos. His videos suit both children and the old. Kids can laugh their hearts out as they dance to the tunes of original children’s songs that this YouTuber brings to the table. Get videos of a mix of music, videos, and live streams from this top US YouTube channel. They have a total of 101 million subscribers so far.
4) WWE

The World Wrestling Entertainment has rocked your screens for the better part of your heydays. It also scales among the biggest YouTuber in the world this year. It is entertainment-based and splashes your screen with scripted and partially choreographed boxing matches. Check out the channel for your favorite WWE superstars and other original shows. It has subscribers reaching 76 million.
5) Mr. Beast

In the fifth position is Mr. Beast, with 75 million subscribers. He is based in the US and is well known for his easy tactics of capturing an audience. He dwells majorly on pranks and other social events. Also known for his philanthropic nature, sending smiles to huge crowds with his charitable donations.
6) Kids Diana Show

Here comes number 6 in the top 10 YouTubers with the most subscribers. This Ukrain based YouTube channel has about 70.4 million subscribers and is mostly watched by children alike. Kids Diana focuses on a beautiful princess known as Diana, her life, and how it feels to be a loved kid. It dwells on play videos of toy unboxing and going for trips, among other adventure activities for kids.
7) 5-Minute Crafts

The Do-It-Yourself channel show is a darling to many fans who wish to learn new home science tricks. It offers easy means to learn a couple of crafts, giving you the joy of knowing how to maneuver on any home project. Its subscribers reached about 70.3 million this year. Do the tricks work? Try one popular one demonstrating how to make an egg bigger and bluer by simply socking it in white vinegar overnight.
8) Zee Music Company

This is an Indian company, bringing to your screens Indian music and other videos. It had reached 70 million viewers by 2021. If you want to learn some Indian dance moves, then this is a perfect platform for you. It also houses over 200,000 hours of television content and much more.
9) Like Nastya

It is also among the biggest YouTuber in the world and focuses on kids’ TV shows. It’s a Russian Federation show that features Like Nastya and her parents. Its major focus is on kids’ activities like singing, going on adventure trips, and some nursery rhymes. It has about 70 million subscribers.
10) Justin Bieber

He is a Canadian singer and songwriter. He started singing at a tender age and even one time took the second position in a local competition. He eventually rose to fame after appearing on YouTube, managing a rise in the number of subscribers, currently at 60 million. Watch his channel for music videos, promotion materials, interviews, and behind-the-scenes footage from his shoots.
What are the similarities of the top 10 YouTubers listed above?
A few lines of thought are common with these top 10 YouTubers with the most subscribers. Here are some similarities.
Highly watchable content
These top YouTubers know how to engage their viewers. They take their time and give a much deeper approach to the content that they post on YouTube. It is a quick turnaround for subscribers who want value.
Focusing on a market niche
These YouTubers have a passion for a particular niche. For example, film production, kid’s shows, music, and so on. It seems they are talented in those areas of choice, and much focus is on how to better them.
Engage with your audience
This is a crucial part if you want to be a successful YouTuber. These top 10 creators have shown that engaging with their audience has a great impact on the outcome of their production.
They have executed channel trailers
Another common similarity with these top 10 YouTubers is the use of channel trailers features. You get short trailers that automatically play when a viewer lands on the YouTube channel page. These should, however, be short and give viewers a welcoming feeling to stay along.
Call To Action
The reason why these content creators stay ahead is the urge to continue getting more subscribers. These channels have well-illustrated avenues for more potential subscribers. More so, they have several elements at the end-screen.
They earn
Their YouTube channels are making some good bucks for them. It is estimated that PewDiePie makes about $10 million per year from his YouTube channel, while Justin Bier gets about $9 million from YouTube advertising.
Additional thoughts - the importance of a well-made video
A well-made video is all you need to make an impact on your YouTube channel journey.
- It automatically boosts conversions and sales by engaging your viewers. In no time, this will directly lead to sales.
- Content marketing involves building trust to create a long-term relationship. A good video will let people come to you because they know you got value, just as the video attests.
- It is a perfect form of igniting emotions and engaging your viewers. So, better give them quality content.
- Videos are good platforms for viewers to learn in detail. For example, a tutorial video will show clearly the steps to follow for a particular project until success.
- If you want your content to be widely accessed, then use a video to encourage social shares. Any good content will automatically find its way into the social world via shares among friends.
How to make a good video using Filmora
Using available video editors can help you become among the most subs on YouTube. Filmora comes loaded with editing effects to help you create quality and amazing videos. The user interface is easy to navigate, therefore suiting even beginners. Follow these steps to make a quality video with Filmora.
Step 1. Launch Filmora
Firstly, download and install Filmora on your computer. Then launch it by double-clicking on the desktop icon. You have two options. Either to create a new project or to open an existing project.
Step 2. Create a new project
If you don’t have any project you were using before, you can create a new one. Click the “New Project” option and wait for the editor to load. Also, ensure to register your product by clicking the “Register” button. Then go to the “Project settings” option and select the aspect ratio to use.
Step 3. Import the footage
Go to the upper section of the screen and click the “Import” button > “Import Media Files” option. Then go to the section on your computer hard drive where your footage to be edited is stored. Next, select the video and click on the “Import” button.
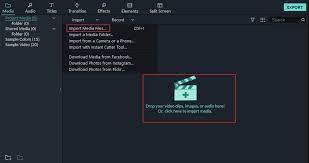
Step 4. Organize your material
Then begin to organize the files you have imported. You can create and use folders to sort out your files from the “My Album” section. Just click on the “Add a New Folder” icon to create a folder and rename it. Then arrange your footage as you wish.
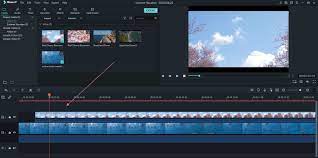
Step 5. Move your videos to the timeline
Here is where you can edit your videos freely. Use the drag and drop feature to add them. You can also rearrange your files by dragging the files to the desired position in the timeline. You can then preview your videos by clicking the “Play” tab or using the “Playhead” to jump to a certain portion of the video.
Step 6. Edit video
Filmora lets you add effects and modify your video to your satisfaction. You can trim by dragging the end of a video clip on the right or left side. Likewise, you can apply other visual effects like insert transitions, add music, or even detach the audio and video to put background music of choice. More so, it’s easy to add text like opening titles, end credits, and so on to your video. Engage the available templates by dragging and dropping that of your choice to the timeline. Then add the appropriate text in Filmora’s preview window.
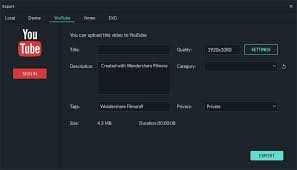
Step 7. Export and Share
Finally, you can export your video in any format. Just click on the “Export” button, and you’ll be redirected to the “Output Window”. Select the video file format in the “Format” menu and optimize your video YouTube.
For Win 7 or later (64-bit)
For macOS 10.12 or later
Conclusion
● It’s a done deal. Filmora works best to help you create quality content for your YouTube channel. Follow the steps, and you could be the next most subs on YouTube next year.
It is that time of the year when everyone is jostling for creators who made it on YouTube. Being a popular streaming service with over 2 billion monthly viewers, YouTube fans are far attached to the proceedings and improvements of YouTube. More so, it’s the place where you get any content, no matter what interests you, from podcasts, videos, music, vlogs, and other tutorials. And you must be eager to meet the biggest YouTuber in the world among other well-rated creators. Well, we have compiled a complete list of 10 creators with the most subscribers. Dive in for more!
In this article
01 Top 10 YouTubers with the Most Subscribers in 2024
02 What are the similarities of the top 10 YouTubers listed above?
03 Additional thoughts - the importance of a well-made video
Top 10 YouTubers with the Most Subscribers in 2024
Check out the YouTubers who scaled the heights in 2024.
1) T-Series
The top on our list is T-Series. This group is led by the Great Visionary, Sh. Gulshan Kumar, whose focus has been on offering quality content to viewers. This is a film production company from India and has been at the forefront of giving constant entertainment. From its 30 years of existence, the group has potentially grown to own 166 million subscribers worldwide.
2) Felix Arvid PewDiePie
Among the most subs on YouTube is PweDiePie that has been at the forefront for quite some time but was recently pushed to the second position. He dwells on hilarious meme videos, cracking your ribs and kicking that chilly feeling out of you. The Swedish YouTuber has reached the 102 million subscriber mark. He is regarded as an influencer due to his entertaining personality. Check out some of his works and subscribe to his channel for more updates as well.
3) Cocomelon
Cocomelon knows how to keep you locked in with his 3D animation videos. His videos suit both children and the old. Kids can laugh their hearts out as they dance to the tunes of original children’s songs that this YouTuber brings to the table. Get videos of a mix of music, videos, and live streams from this top US YouTube channel. They have a total of 101 million subscribers so far.
4) WWE
The World Wrestling Entertainment has rocked your screens for the better part of your heydays. It also scales among the biggest YouTuber in the world this year. It is entertainment-based and splashes your screen with scripted and partially choreographed boxing matches. Check out the channel for your favorite WWE superstars and other original shows. It has subscribers reaching 76 million.
5) Mr. Beast
In the fifth position is Mr. Beast, with 75 million subscribers. He is based in the US and is well known for his easy tactics of capturing an audience. He dwells majorly on pranks and other social events. Also known for his philanthropic nature, sending smiles to huge crowds with his charitable donations.
6) Kids Diana Show
Here comes number 6 in the top 10 YouTubers with the most subscribers. This Ukrain based YouTube channel has about 70.4 million subscribers and is mostly watched by children alike. Kids Diana focuses on a beautiful princess known as Diana, her life, and how it feels to be a loved kid. It dwells on play videos of toy unboxing and going for trips, among other adventure activities for kids.
7) 5-Minute Crafts
The Do-It-Yourself channel show is a darling to many fans who wish to learn new home science tricks. It offers easy means to learn a couple of crafts, giving you the joy of knowing how to maneuver on any home project. Its subscribers reached about 70.3 million this year. Do the tricks work? Try one popular one demonstrating how to make an egg bigger and bluer by simply socking it in white vinegar overnight.
8) Zee Music Company
This is an Indian company, bringing to your screens Indian music and other videos. It had reached 70 million viewers by 2021. If you want to learn some Indian dance moves, then this is a perfect platform for you. It also houses over 200,000 hours of television content and much more.
9) Like Nastya
It is also among the biggest YouTuber in the world and focuses on kids’ TV shows. It’s a Russian Federation show that features Like Nastya and her parents. Its major focus is on kids’ activities like singing, going on adventure trips, and some nursery rhymes. It has about 70 million subscribers.
10) Justin Bieber
He is a Canadian singer and songwriter. He started singing at a tender age and even one time took the second position in a local competition. He eventually rose to fame after appearing on YouTube, managing a rise in the number of subscribers, currently at 60 million. Watch his channel for music videos, promotion materials, interviews, and behind-the-scenes footage from his shoots.
What are the similarities of the top 10 YouTubers listed above?
A few lines of thought are common with these top 10 YouTubers with the most subscribers. Here are some similarities.
Highly watchable content
These top YouTubers know how to engage their viewers. They take their time and give a much deeper approach to the content that they post on YouTube. It is a quick turnaround for subscribers who want value.
Focusing on a market niche
These YouTubers have a passion for a particular niche. For example, film production, kid’s shows, music, and so on. It seems they are talented in those areas of choice, and much focus is on how to better them.
Engage with your audience
This is a crucial part if you want to be a successful YouTuber. These top 10 creators have shown that engaging with their audience has a great impact on the outcome of their production.
They have executed channel trailers
Another common similarity with these top 10 YouTubers is the use of channel trailers features. You get short trailers that automatically play when a viewer lands on the YouTube channel page. These should, however, be short and give viewers a welcoming feeling to stay along.
Call To Action
The reason why these content creators stay ahead is the urge to continue getting more subscribers. These channels have well-illustrated avenues for more potential subscribers. More so, they have several elements at the end-screen.
They earn
Their YouTube channels are making some good bucks for them. It is estimated that PewDiePie makes about $10 million per year from his YouTube channel, while Justin Bier gets about $9 million from YouTube advertising.
Additional thoughts - the importance of a well-made video
A well-made video is all you need to make an impact on your YouTube channel journey.
- It automatically boosts conversions and sales by engaging your viewers. In no time, this will directly lead to sales.
- Content marketing involves building trust to create a long-term relationship. A good video will let people come to you because they know you got value, just as the video attests.
- It is a perfect form of igniting emotions and engaging your viewers. So, better give them quality content.
- Videos are good platforms for viewers to learn in detail. For example, a tutorial video will show clearly the steps to follow for a particular project until success.
- If you want your content to be widely accessed, then use a video to encourage social shares. Any good content will automatically find its way into the social world via shares among friends.
How to make a good video using Filmora
Using available video editors can help you become among the most subs on YouTube. Filmora comes loaded with editing effects to help you create quality and amazing videos. The user interface is easy to navigate, therefore suiting even beginners. Follow these steps to make a quality video with Filmora.
Step 1. Launch Filmora
Firstly, download and install Filmora on your computer. Then launch it by double-clicking on the desktop icon. You have two options. Either to create a new project or to open an existing project.
Step 2. Create a new project
If you don’t have any project you were using before, you can create a new one. Click the “New Project” option and wait for the editor to load. Also, ensure to register your product by clicking the “Register” button. Then go to the “Project settings” option and select the aspect ratio to use.
Step 3. Import the footage
Go to the upper section of the screen and click the “Import” button > “Import Media Files” option. Then go to the section on your computer hard drive where your footage to be edited is stored. Next, select the video and click on the “Import” button.
Step 4. Organize your material
Then begin to organize the files you have imported. You can create and use folders to sort out your files from the “My Album” section. Just click on the “Add a New Folder” icon to create a folder and rename it. Then arrange your footage as you wish.
Step 5. Move your videos to the timeline
Here is where you can edit your videos freely. Use the drag and drop feature to add them. You can also rearrange your files by dragging the files to the desired position in the timeline. You can then preview your videos by clicking the “Play” tab or using the “Playhead” to jump to a certain portion of the video.
Step 6. Edit video
Filmora lets you add effects and modify your video to your satisfaction. You can trim by dragging the end of a video clip on the right or left side. Likewise, you can apply other visual effects like insert transitions, add music, or even detach the audio and video to put background music of choice. More so, it’s easy to add text like opening titles, end credits, and so on to your video. Engage the available templates by dragging and dropping that of your choice to the timeline. Then add the appropriate text in Filmora’s preview window.
Step 7. Export and Share
Finally, you can export your video in any format. Just click on the “Export” button, and you’ll be redirected to the “Output Window”. Select the video file format in the “Format” menu and optimize your video YouTube.
For Win 7 or later (64-bit)
For macOS 10.12 or later
Conclusion
● It’s a done deal. Filmora works best to help you create quality content for your YouTube channel. Follow the steps, and you could be the next most subs on YouTube next year.
- Title: "2024 Approved Navigating the Digital Realm Uploading with Premiere & YouTube"
- Author: Joseph
- Created at : 2024-05-31 13:44:13
- Updated at : 2024-06-01 13:44:13
- Link: https://youtube-stream.techidaily.com/2024-approved-navigating-the-digital-realm-uploading-with-premiere-and-youtube/
- License: This work is licensed under CC BY-NC-SA 4.0.
