
:max_bytes(150000):strip_icc():format(webp)/gopro-2619915_1920-2ca3364339c348e5ba44afb3fa79458b.jpg)
"2024 Approved Harmonize Platforms Uploading Twitch Content for YouTube Audience"
Harmonize Platforms: Uploading Twitch Content for YouTube Audience
Create High-Quality Video - Wondershare Filmora
An easy and powerful YouTube video editor
Numerous video and audio effects to choose from
Detailed tutorials provided by the official channel
Amidst many online applications is Twitch. This live streaming platform takes your experience to another level. You can use it to make crafts, play games, attract broadcasters, and many more. Twitch was launched in 2011, and since then, it has attracted millions of users, managing a database of about 4 million broadcasters by early 2020. With it, users can stream their activities as others watch in real-time. Just browse a category to find a stream.
You can also follow streamers that you like on the platform and get updates and notifications immediately after they are posted. But how do you start a career on a platform like Twitch? You need to broadcast and gather a large following. You can use built-in audiences from other platforms like Facebook. Let’s dive into the core of the matter and look at how to upload Twitch streams to YouTube and build your platform.

In this article
02 What is the benefit of uploading your Twitch Streams to YouTube
03 How to upload your Twitch Streams to YouTube
What is Twitch VOD?
Twitch Video on Demand (VOD) is a recording of previously streamed content. It provides briefings if you missed catching the Twitch live stream. Just watch the VOD from your favorite streamer and be engaged the best way possible. However, VODs don’t last forever. They are removed after two weeks of broadcast. But streamers with Partner Status can have their VODs last up to 60 days.
- How to enable Twitch VOD?
VODs are the best form to archive streams that your fans missed. Even though they are not enabled by default, you can manually enable them and not let your fans miss any important event from your channel. They’ll find it under the “Videos” tab on any Twitch channel. Follow these steps to enable VOD on your channel.
Step 1. Go to your profile icon in the top right corner of Twitch
Check in the “Channel & Video” section and locate the “Stream Key & Preferences” menu.

Step 2. Click on “Creator Dashboard”
Remember, you can enable VODs from your creator dashboard. Just go under the “Settings” tab and click on the “Stream section” of the creator dashboard. Check under the subtitle “VOD Settings” and get the option to store past broadcasts. You can also toggle the slider to store your past broadcasts.

Step 3 Click on the “Settings” tab on the left-hand side and go to Stream
You’ll get various drop-down menu options. Click on the “Settings” tab and choose the “Stream” option. The system will navigate to a new page, thus setting your preferences for VODs and clips.
Step 4. Go to “VOD Settings” and toggle on the “Store Past Broadcast.”
Ensure you have the toggle option turned ON under the “VOD Settings.” If it’s “ON,” you’ll realize the toggle will be purple, with a checkmark in it. Twitch will be confirmed to be enabled if it’s purple.

- Frequently Asked Question about Twitch VOD
These are some questions frequently asked by Twitch users.
1. How long will Twitch store my VOD
Your Twitch can either be stored for 14 or 60 days, depending on your level. For Twitch Prime, Twitch Partner or a Twitch Turbo user has their past broadcasts automatically saved for 60 days before deletion. But if you are not connected to these three options, your past broadcasts will be saved for only 14 days before deletion.
Since your past broadcasts cannot be live for more than 60 days, you have the option to download the video to your computer before the validity days expire and Twitch deletes it. You can use an External Hard drive to save the past broadcast content. Likewise, it is possible to turn your past broadcast content into Highlight and, in turn, permanently store them on Twitch.
2. What is the difference between Twitch VOD, Highlights, and Clips
Twitch VOD is a previously saved video of your live stream content. You choose to save either part or the entire content of your previously streamed content. More so, you don’t need any additional requirements to use VOD.
Highlights are short videos that have been edited from your past broadcast content. You can save them on Twitch permanently. Streamers majorly use highlights to save video game achievements. Unlike VOD Twitch that can be saved up to 60 days, Highlights usually lasts no more than 3 minutes.
- To make Highlights on Twitch, first, navigate to your Dashboard.
- Then scroll down and click on “Content” > “Video Producer.
- Next, press on “All Videos” to change them to “Past Broadcasts.”
- Now press the “Highlight” button, and Twitch will immediately open a new tab for “Twitch Highlighter Tool.”
- Then select the video part to include as “Highlight” and press the “Create Highlights” button.
- Wait a while for the process to be completed, and Voila! You have your Highlights created.
When it comes to Twitch Clip, you can capture special moments in a stream you are currently watching. On the same note, you can share clips with friends and other users on social media platforms. Such shared clips contain a link where others view the source or video from.
The clips you create will automatically be saved on the streamer’s channel on the “Clips” page, where other viewers can see them too. Nonetheless, you can download “clips” to your computer and, in turn, upload them whenever you want to. And note that you can help your stream grow via “Clips” by letting your viewers clip and share your stream moments.
- To create “Clips” on Twitch, identify which Streamers channel you wish to create a clip from.
- Then click on the “Clapper board” icon. Next, edit your clip between 5 and 60 seconds long.
- Finally, create a title and publish your Clip. You’ll also enjoy the privilege to share your clip’s link to other social media networks.
What is the benefit of uploading your Twitch Streams to YouTube
You stand to gain a lot when you upload your Twitch Streams to YouTube.
1) To enlighten your followers
Your followers will see your streams and make the best decisions. Viewers can check out your recordings and other highlights from past streams. It will help them decide whether they like what they see and probably join your live streams.
2) Twitch provides content for you to share and monetize on YouTube
Since Twitch streaming is more popular nowadays, many people throng it for content. It is not wise to rely entirely on Twitch to discover as a Twitch Streamer. Posting to YouTube will make it known within a short time. You would have announced your streams most nobly and kept your followers up to date, attracting new ones as well.
3) To keep your followers engaged even when you are offline
Even though live streaming is important, some viewers may not attend the live sessions due to different time zones or other commitments. In this regard, when uploaded to YouTube, Twitch will give them a chance to watch your content just whenever they log in. They, therefore, have the option to watch a Twitch VOD of the live stream they missed.
How to upload your Twitch Streams to YouTube
Check how to upload Twitch streams to YouTube from the Twitch website.
Step 1. Identify the little arrow next to your name on the Twitch website and click on it. Then click on the “Video Producer” to take you to a list of your Twitch videos.

Step 2. Check out and click on the “three-dots” on the video you wish to upload to YouTube. Click on the “Export” tab.
Step 3. A menu will then pop up. Here, you can fill in the description, title, and tags that you would like to appear on the YouTube video. There is an option for Twitch to split your video automatically. If you wish so, then tick the “Checkbox” to enable it. Then click on the “Start Export” option to export your Twitch streams to YouTube.

Bouns! Edit Your Twitch Video with Filmora
The quality of your video matters when it comes to uploading Twitch Streams to YouTube. Using a third-party tool to edit your video is the first step in ensuring your videos communicate meaningful content. Filmora comes in handy to bring your imaginations to life. Use it for simple creation without limits, even for beginners.
- Use it to track moving objects in video clips
- Easily match any image of the selected clip
- Its powerful tools let you edit your video by cropping, splitting, adjusting speed, etc
- The video keyframe easily indicates the beginning and end of the parameters
For Win 7 or later (64-bit)
For macOS 10.12 or later
Conclusion
● Don’t just focus on how to upload Twitch streams to YouTube but also consider the quality of video you are posting to YouTube. Remember, your video quality will speak much more of you than any other description. So, strive to produce quality videos using the best tool, Filmora. The app is easy to use and will elevate your views and imaginations through your video in the most impactful way.
Amidst many online applications is Twitch. This live streaming platform takes your experience to another level. You can use it to make crafts, play games, attract broadcasters, and many more. Twitch was launched in 2011, and since then, it has attracted millions of users, managing a database of about 4 million broadcasters by early 2020. With it, users can stream their activities as others watch in real-time. Just browse a category to find a stream.
You can also follow streamers that you like on the platform and get updates and notifications immediately after they are posted. But how do you start a career on a platform like Twitch? You need to broadcast and gather a large following. You can use built-in audiences from other platforms like Facebook. Let’s dive into the core of the matter and look at how to upload Twitch streams to YouTube and build your platform.
In this article
02 What is the benefit of uploading your Twitch Streams to YouTube
03 How to upload your Twitch Streams to YouTube
What is Twitch VOD?
Twitch Video on Demand (VOD) is a recording of previously streamed content. It provides briefings if you missed catching the Twitch live stream. Just watch the VOD from your favorite streamer and be engaged the best way possible. However, VODs don’t last forever. They are removed after two weeks of broadcast. But streamers with Partner Status can have their VODs last up to 60 days.
- How to enable Twitch VOD?
VODs are the best form to archive streams that your fans missed. Even though they are not enabled by default, you can manually enable them and not let your fans miss any important event from your channel. They’ll find it under the “Videos” tab on any Twitch channel. Follow these steps to enable VOD on your channel.
Step 1. Go to your profile icon in the top right corner of Twitch
Check in the “Channel & Video” section and locate the “Stream Key & Preferences” menu.
Step 2. Click on “Creator Dashboard”
Remember, you can enable VODs from your creator dashboard. Just go under the “Settings” tab and click on the “Stream section” of the creator dashboard. Check under the subtitle “VOD Settings” and get the option to store past broadcasts. You can also toggle the slider to store your past broadcasts.
Step 3 Click on the “Settings” tab on the left-hand side and go to Stream
You’ll get various drop-down menu options. Click on the “Settings” tab and choose the “Stream” option. The system will navigate to a new page, thus setting your preferences for VODs and clips.
Step 4. Go to “VOD Settings” and toggle on the “Store Past Broadcast.”
Ensure you have the toggle option turned ON under the “VOD Settings.” If it’s “ON,” you’ll realize the toggle will be purple, with a checkmark in it. Twitch will be confirmed to be enabled if it’s purple.
- Frequently Asked Question about Twitch VOD
These are some questions frequently asked by Twitch users.
1. How long will Twitch store my VOD
Your Twitch can either be stored for 14 or 60 days, depending on your level. For Twitch Prime, Twitch Partner or a Twitch Turbo user has their past broadcasts automatically saved for 60 days before deletion. But if you are not connected to these three options, your past broadcasts will be saved for only 14 days before deletion.
Since your past broadcasts cannot be live for more than 60 days, you have the option to download the video to your computer before the validity days expire and Twitch deletes it. You can use an External Hard drive to save the past broadcast content. Likewise, it is possible to turn your past broadcast content into Highlight and, in turn, permanently store them on Twitch.
2. What is the difference between Twitch VOD, Highlights, and Clips
Twitch VOD is a previously saved video of your live stream content. You choose to save either part or the entire content of your previously streamed content. More so, you don’t need any additional requirements to use VOD.
Highlights are short videos that have been edited from your past broadcast content. You can save them on Twitch permanently. Streamers majorly use highlights to save video game achievements. Unlike VOD Twitch that can be saved up to 60 days, Highlights usually lasts no more than 3 minutes.
- To make Highlights on Twitch, first, navigate to your Dashboard.
- Then scroll down and click on “Content” > “Video Producer.
- Next, press on “All Videos” to change them to “Past Broadcasts.”
- Now press the “Highlight” button, and Twitch will immediately open a new tab for “Twitch Highlighter Tool.”
- Then select the video part to include as “Highlight” and press the “Create Highlights” button.
- Wait a while for the process to be completed, and Voila! You have your Highlights created.
When it comes to Twitch Clip, you can capture special moments in a stream you are currently watching. On the same note, you can share clips with friends and other users on social media platforms. Such shared clips contain a link where others view the source or video from.
The clips you create will automatically be saved on the streamer’s channel on the “Clips” page, where other viewers can see them too. Nonetheless, you can download “clips” to your computer and, in turn, upload them whenever you want to. And note that you can help your stream grow via “Clips” by letting your viewers clip and share your stream moments.
- To create “Clips” on Twitch, identify which Streamers channel you wish to create a clip from.
- Then click on the “Clapper board” icon. Next, edit your clip between 5 and 60 seconds long.
- Finally, create a title and publish your Clip. You’ll also enjoy the privilege to share your clip’s link to other social media networks.
What is the benefit of uploading your Twitch Streams to YouTube
You stand to gain a lot when you upload your Twitch Streams to YouTube.
1) To enlighten your followers
Your followers will see your streams and make the best decisions. Viewers can check out your recordings and other highlights from past streams. It will help them decide whether they like what they see and probably join your live streams.
2) Twitch provides content for you to share and monetize on YouTube
Since Twitch streaming is more popular nowadays, many people throng it for content. It is not wise to rely entirely on Twitch to discover as a Twitch Streamer. Posting to YouTube will make it known within a short time. You would have announced your streams most nobly and kept your followers up to date, attracting new ones as well.
3) To keep your followers engaged even when you are offline
Even though live streaming is important, some viewers may not attend the live sessions due to different time zones or other commitments. In this regard, when uploaded to YouTube, Twitch will give them a chance to watch your content just whenever they log in. They, therefore, have the option to watch a Twitch VOD of the live stream they missed.
How to upload your Twitch Streams to YouTube
Check how to upload Twitch streams to YouTube from the Twitch website.
Step 1. Identify the little arrow next to your name on the Twitch website and click on it. Then click on the “Video Producer” to take you to a list of your Twitch videos.
Step 2. Check out and click on the “three-dots” on the video you wish to upload to YouTube. Click on the “Export” tab.
Step 3. A menu will then pop up. Here, you can fill in the description, title, and tags that you would like to appear on the YouTube video. There is an option for Twitch to split your video automatically. If you wish so, then tick the “Checkbox” to enable it. Then click on the “Start Export” option to export your Twitch streams to YouTube.
Bouns! Edit Your Twitch Video with Filmora
The quality of your video matters when it comes to uploading Twitch Streams to YouTube. Using a third-party tool to edit your video is the first step in ensuring your videos communicate meaningful content. Filmora comes in handy to bring your imaginations to life. Use it for simple creation without limits, even for beginners.
- Use it to track moving objects in video clips
- Easily match any image of the selected clip
- Its powerful tools let you edit your video by cropping, splitting, adjusting speed, etc
- The video keyframe easily indicates the beginning and end of the parameters
For Win 7 or later (64-bit)
For macOS 10.12 or later
Conclusion
● Don’t just focus on how to upload Twitch streams to YouTube but also consider the quality of video you are posting to YouTube. Remember, your video quality will speak much more of you than any other description. So, strive to produce quality videos using the best tool, Filmora. The app is easy to use and will elevate your views and imaginations through your video in the most impactful way.
An Expert’s Blueprint for Calculating Your Video’s Impact & Income
It’s not the easiest way to earn money online, but YouTube is one of the best ways. YouTube is a powerful channel to promote your video and get more traffic.
The most common question is how much YouTubers earn on 100, 1000, or 10,000 views. We’re going to answer that question in this article and explain how to calculate YouTube views to money.
First off, we’re going to talk about how YouTube works.
Next, we’ll examine the importance of YouTube views, plus how to calculate them.
- Estimated your YouTube earning by YouTube revenue reports
- How much money can you make on YouTube?
- Bonus tip: Increase YouTube earnings with a powerful video editing software
Part 1: The rules to know for each means earning money from YouTube
As a YouTube creator, finding ways to earn money from your content cannot be easy. Some creators make a living solely off their channels. Others supplement their income with affiliate marketing, sponsorships, and ad revenue. But if you want to earn money from YouTube truly, you need to understand which monetization methods work best for you and your content.
Here’s what you should know when using each method and why you should consider doing so:
| Methods | Viewers/Clicks/Impressions | Earnings/Commission |
|---|---|---|
| YouTube Ads $1 CPM | 1 million Ad views | Average rate per ad=0.18Total ~ $5000 |
| Brand Sponsorships | 5K Sub 5K-30K Sub 30K-500K Sub 500K-1M+ Sub | $300 $700 $950 $3500 |
| Affiliate Marketing 30%-35% commission | If 100 people buys $20 product through affiliate link. Total $2000 | $2000*35%= $700 |
| Crowdfunding (Patreon, Indiegogo, GoFundMe) $5 | 100 subscribers funds the channel | 100*5=$500 |
| Merchandise Shelf $5 Shirt | 100 subscribers purchases your merch | 100*5=$500 |
| Channel Memberships $5/month | 100 loyal subscribers join membership | 100*5=$500 |
YouTube Ads
The video ads on the platform aren’t lucrative and can be used to supplement your income in the form of AdSense earnings. An actual advertiser pays 0.18 per ad view on average (as shown above). That means 1000 ad views equals $18 and $3-$5 per 1000 views.
Brand Sponsorships
Brands can sponsor your videos to reach their target audience. YouTube videos are a big part of our lives, and brands are becoming increasingly aware of how useful these videos can be. To be eligible for sponsorship, your channel must be of 5000 subscribers.
Affiliate Marketing
YouTubers help brands increase sales by encouraging their viewers to shop at the company’s store or visit its specific product pages. They then earn a commission (30%-35%) on products that people buy after clicking an affiliate link.
Crowdfunding
Today many people use crowdfunding websites to raise money for personal, channel-related projects. Most YouTubers are doing it to generate steady cash flow. Some of them use this source to fund their YouTube videos so that it increases quality and engagement.
Merchandise Shelf
Your merchandise represents and feeds your audience’s connection with you. Your product is your business, so you’re first and foremost an entrepreneur. Then design your YouTube marketing strategy to sell your merchandise and generate income.
Channel Membership
YouTube has a plan that allows you to charge your subscribers for membership on your YouTube channel. Members get access to exclusive live chats, badges, emojis, etc. Subscribers must give a set amount every month to a channel that makes a steady monthly income for YouTubers.
Part 2: Calculate YouTube income by YouTube Money Calculator
How much money do you earn on YouTube? There is no simple way to answer this question, but a YouTube income calculator can give you a rough estimate. It shows you whether you’re getting enough money to keep producing videos or if you need to look for additional ways of making money from your channel.
The tools below provide a detailed breakdown of the earnings from a specific YouTube video or channel based on audience engagement, views, and other factors.
YouTube Money Calculator

Pros
- Does not ask for much information, just a URL
- It has flexibility to check earnings by channel and video separately
Cons
- Calculate earnings based on views only
How-to-steps
Step1 To check earnings by channel, import the channel URL and click the search icon.

Step2 You’ll see the result showing, ‘Number of total Subscribers’, ‘Number of Total Video Views’, ‘Total estimated earnings’, and ‘Average Earnings per Video’.

Step3 If you want to check earnings by video, below you’ll see another search bar where you can paste the specific video URL.

Step4 The result will show you the ‘Number of Total Video Views’, and ‘Estimated Video earnings’.

Aux mode
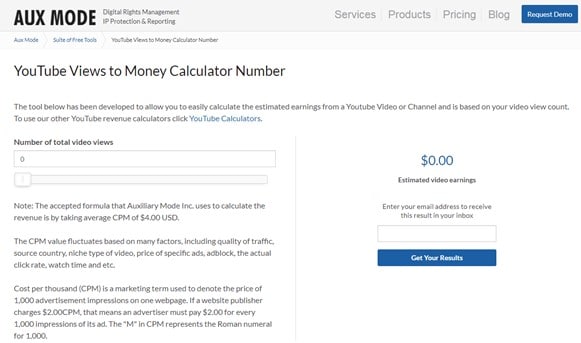
Pros
- Easy interface, with a view slider
- Does Not require any information
Cons
- Based on your video view count only
How-to-steps
Go to AUX MODE
Step1 You can type total video views or, increase or decrease total views with the arrows.
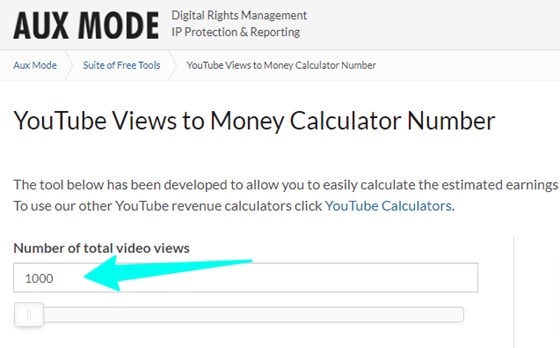
Step2 Below you’ll find a slider, you can slide forward to increase views and vice versa.

Step3 On your right, you’ll find estimated results in real time. You can also enter your email address to recieve the result in you inbox.

Tunepocket

Pros
- Slider interface shows real time result
- It shows all results based on views, existing video, and revenue of whole channel
Cons
- None
How-to-steps
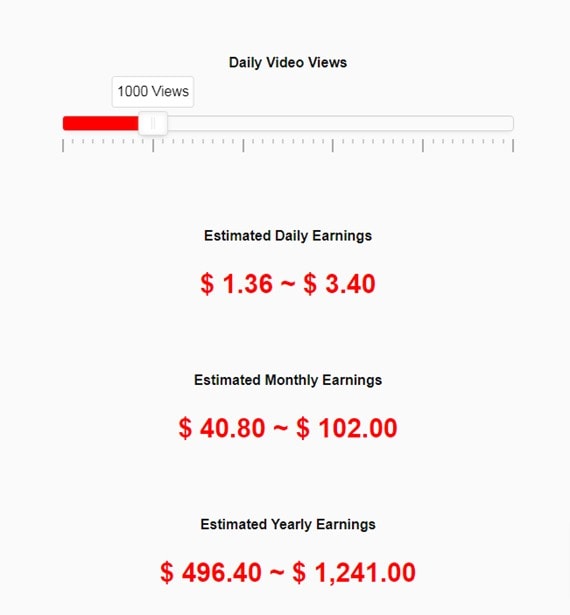
Step1 The first calculator on the page is based on daily views. Drag the slider according to your video views and below you’ll find estimated earnings including daily, monthly, and annually.
Step2 Scroll down and you’ll find another calculator that requires specific video URL. Copy and paste the URL of YouTube video and get results based on views.

Step3 The last calculator is about the estimated revenue for a channel. You need to paste the channel URL to find the results. It includes, Number of Total Subscribers, Number of Total Videos, Number of Total Video Views, Channel Title, and Estimated Total Earnings

Part 3: Estimated your YouTube earning by YouTube revenue reports
To better understand the best strategies and tactics to optimize your video content, use YouTube analytic reports to help you get a clearer understanding of how your YouTube channel performs. To check your revenue report:
Step1 Login to your YouTube Studio

Step2 In the left menu, select Analytics.

Step3 From the top menu, select Revenue.

RPM
The RPM is calculated based on how much traffic you’re getting from YouTube compared to all your other sources combined. RPM is calculated as total revenue divided by total views times 1000.
Playback-based CPM
Your CPM (Cost Per Thousand) report tells you how much each ad was worth in terms of the percentage of each play a video was spent. The playback-based CPM report shows your estimated average gross revenue per 1000 playbacks where one or more ads are shown.
Monthly estimated revenue
This is a simple report showing the statistics of your video earnings over the last 6 months. It can fluctuate by invalid traffic, content disputes and ad campaign types.
Revenue sources
You must use this report to see your estimated revenue from each revenue source if you have different revenue sources.
Transaction revenue
The transactions reports show you how much your members and fans have spent in transactions. It shows estimated earnings from channel memberships and merch.
Top-earning videos
This top-earning videos report will show you the most profitable videos and their estimated revenue.
Ad type
If you use different types of Ads for your videos, this report will help you find the percentage of your Ads revenue from each ad type.
Part 4: How much money can you make on YouTube?
The answer to that question can vary widely depending on the type of content you produce and the demographics of your target market. However, we’ve found that a single video ad can be worth anywhere from around $100 to $5,000.
It’s safe to say that most YouTubers earn between $1,000 and $10,000 per month from their ads alone. But there are many other factors to take into consideration when calculating the money, you can make on YouTube:
The number of views your videos get
The key to making money from videos on YouTube is views. The more views you have, the more chance of getting paid will increase. So you need to create videos that will get viewers to click.
According to Forbes’s estimation, you can make $3-$5 per 1000 views. e.g., a video with 1,000,000 views can make around $5,000 on views only.
The engagement level of your audience
When building a YouTube channel, the key to success lies in engaging with your audience. After all, if they don’t like what you’re offering, they will not watch your videos. So you’ve got to have a message that resonates and is useful.
Your channel type
The YouTube algorithm is set up to favor channels with a high volume of views per video and high-quality content rather than low-quality channels that generate a lot of traffic but don’t produce quality videos. So, if you want to increase your revenue from your YouTube videos, try to focus on high-quality content.
Your monetization method
Several monetization methods exist, including Subscription, advertising, affiliate marketing, paid search, and sponsorships. Each monetization method requires a slightly different setup and management, resulting in different revenue.
The country you are in
It is important to know that in some countries, making money off YouTube is extremely difficult. For example, in certain countries, monetizing your videos is impossible without using illegal methods, which will get you into legal trouble.
Some other factors, e.g., it’s worth comparing the RPM of your country and other countries, different rules and prices of YouTube Ads depending on your country.
Bonus tip: Increase YouTube earnings with a powerful video editing software
Are you tired of your boring, run-of-the-mill videos? Are you looking for ways to improve your YouTube earnings? Then let’s look at some of the best editing software to help create your next great content.
Wondershare Filmora is a powerful yet easy-to-use video editing software that makes it easier than ever to make awesome videos. Filmora offers more than 50 cutting-edge tools and effects that make it easier to edit any media source, including videos, photos, and music and share the result in just minutes. Use Filmora’s powerful features like keyframing, motion tracking, split screen, instant mode, VFX, templates etc., to make your video stand out.
Here’s a demo of the software, editing YouTube Shorts:
Free Download For Win 7 or later(64-bit)
Free Download For macOS 10.14 or later
Step1 Open Filmora 11 application.

Step2 Open Project Settings

Step3 Change Aspect Ratio, Resolution, and Frame rate

Step4 Drag video to the timeline

Step5 Right-click and select Crop to Fit

Step6 Right-Click again and select Crop and Zoom

Step7 Adjust the frame

Step8 Lastly Export you file

Bottom line
People want to watch a video when searching for the answers to a question. The best videos are designed to help users accomplish their specific goals while providing them with something they can take away and use for themselves. You need to put up good videos to keep viewers coming back.
To do that, use the game-changing Filmora 11 (mentioned in the article) to create engaging YouTube videos and amaze your audience. Slowly but surely, your audience will increase and then all the guidance in this article will help you easily analyze, calculate and increase your YouTube revenue.
Free Download For Win 7 or later(64-bit)
Free Download For macOS 10.14 or later
Part 1: The rules to know for each means earning money from YouTube
As a YouTube creator, finding ways to earn money from your content cannot be easy. Some creators make a living solely off their channels. Others supplement their income with affiliate marketing, sponsorships, and ad revenue. But if you want to earn money from YouTube truly, you need to understand which monetization methods work best for you and your content.
Here’s what you should know when using each method and why you should consider doing so:
| Methods | Viewers/Clicks/Impressions | Earnings/Commission |
|---|---|---|
| YouTube Ads $1 CPM | 1 million Ad views | Average rate per ad=0.18Total ~ $5000 |
| Brand Sponsorships | 5K Sub 5K-30K Sub 30K-500K Sub 500K-1M+ Sub | $300 $700 $950 $3500 |
| Affiliate Marketing 30%-35% commission | If 100 people buys $20 product through affiliate link. Total $2000 | $2000*35%= $700 |
| Crowdfunding (Patreon, Indiegogo, GoFundMe) $5 | 100 subscribers funds the channel | 100*5=$500 |
| Merchandise Shelf $5 Shirt | 100 subscribers purchases your merch | 100*5=$500 |
| Channel Memberships $5/month | 100 loyal subscribers join membership | 100*5=$500 |
YouTube Ads
The video ads on the platform aren’t lucrative and can be used to supplement your income in the form of AdSense earnings. An actual advertiser pays 0.18 per ad view on average (as shown above). That means 1000 ad views equals $18 and $3-$5 per 1000 views.
Brand Sponsorships
Brands can sponsor your videos to reach their target audience. YouTube videos are a big part of our lives, and brands are becoming increasingly aware of how useful these videos can be. To be eligible for sponsorship, your channel must be of 5000 subscribers.
Affiliate Marketing
YouTubers help brands increase sales by encouraging their viewers to shop at the company’s store or visit its specific product pages. They then earn a commission (30%-35%) on products that people buy after clicking an affiliate link.
Crowdfunding
Today many people use crowdfunding websites to raise money for personal, channel-related projects. Most YouTubers are doing it to generate steady cash flow. Some of them use this source to fund their YouTube videos so that it increases quality and engagement.
Merchandise Shelf
Your merchandise represents and feeds your audience’s connection with you. Your product is your business, so you’re first and foremost an entrepreneur. Then design your YouTube marketing strategy to sell your merchandise and generate income.
Channel Membership
YouTube has a plan that allows you to charge your subscribers for membership on your YouTube channel. Members get access to exclusive live chats, badges, emojis, etc. Subscribers must give a set amount every month to a channel that makes a steady monthly income for YouTubers.
Part 2: Calculate YouTube income by YouTube Money Calculator
How much money do you earn on YouTube? There is no simple way to answer this question, but a YouTube income calculator can give you a rough estimate. It shows you whether you’re getting enough money to keep producing videos or if you need to look for additional ways of making money from your channel.
The tools below provide a detailed breakdown of the earnings from a specific YouTube video or channel based on audience engagement, views, and other factors.
YouTube Money Calculator
Pros
- Does not ask for much information, just a URL
- It has flexibility to check earnings by channel and video separately
Cons
- Calculate earnings based on views only
How-to-steps
Step1 To check earnings by channel, import the channel URL and click the search icon.
Step2 You’ll see the result showing, ‘Number of total Subscribers’, ‘Number of Total Video Views’, ‘Total estimated earnings’, and ‘Average Earnings per Video’.
Step3 If you want to check earnings by video, below you’ll see another search bar where you can paste the specific video URL.
Step4 The result will show you the ‘Number of Total Video Views’, and ‘Estimated Video earnings’.
Aux mode
Pros
- Easy interface, with a view slider
- Does Not require any information
Cons
- Based on your video view count only
How-to-steps
Go to AUX MODE
Step1 You can type total video views or, increase or decrease total views with the arrows.
Step2 Below you’ll find a slider, you can slide forward to increase views and vice versa.
Step3 On your right, you’ll find estimated results in real time. You can also enter your email address to recieve the result in you inbox.
Tunepocket
Pros
- Slider interface shows real time result
- It shows all results based on views, existing video, and revenue of whole channel
Cons
- None
How-to-steps
Step1 The first calculator on the page is based on daily views. Drag the slider according to your video views and below you’ll find estimated earnings including daily, monthly, and annually.
Step2 Scroll down and you’ll find another calculator that requires specific video URL. Copy and paste the URL of YouTube video and get results based on views.
Step3 The last calculator is about the estimated revenue for a channel. You need to paste the channel URL to find the results. It includes, Number of Total Subscribers, Number of Total Videos, Number of Total Video Views, Channel Title, and Estimated Total Earnings
Part 3: Estimated your YouTube earning by YouTube revenue reports
To better understand the best strategies and tactics to optimize your video content, use YouTube analytic reports to help you get a clearer understanding of how your YouTube channel performs. To check your revenue report:
Step1 Login to your YouTube Studio
Step2 In the left menu, select Analytics.
Step3 From the top menu, select Revenue.
RPM
The RPM is calculated based on how much traffic you’re getting from YouTube compared to all your other sources combined. RPM is calculated as total revenue divided by total views times 1000.
Playback-based CPM
Your CPM (Cost Per Thousand) report tells you how much each ad was worth in terms of the percentage of each play a video was spent. The playback-based CPM report shows your estimated average gross revenue per 1000 playbacks where one or more ads are shown.
Monthly estimated revenue
This is a simple report showing the statistics of your video earnings over the last 6 months. It can fluctuate by invalid traffic, content disputes and ad campaign types.
Revenue sources
You must use this report to see your estimated revenue from each revenue source if you have different revenue sources.
Transaction revenue
The transactions reports show you how much your members and fans have spent in transactions. It shows estimated earnings from channel memberships and merch.
Top-earning videos
This top-earning videos report will show you the most profitable videos and their estimated revenue.
Ad type
If you use different types of Ads for your videos, this report will help you find the percentage of your Ads revenue from each ad type.
Part 4: How much money can you make on YouTube?
The answer to that question can vary widely depending on the type of content you produce and the demographics of your target market. However, we’ve found that a single video ad can be worth anywhere from around $100 to $5,000.
It’s safe to say that most YouTubers earn between $1,000 and $10,000 per month from their ads alone. But there are many other factors to take into consideration when calculating the money, you can make on YouTube:
The number of views your videos get
The key to making money from videos on YouTube is views. The more views you have, the more chance of getting paid will increase. So you need to create videos that will get viewers to click.
According to Forbes’s estimation, you can make $3-$5 per 1000 views. e.g., a video with 1,000,000 views can make around $5,000 on views only.
The engagement level of your audience
When building a YouTube channel, the key to success lies in engaging with your audience. After all, if they don’t like what you’re offering, they will not watch your videos. So you’ve got to have a message that resonates and is useful.
Your channel type
The YouTube algorithm is set up to favor channels with a high volume of views per video and high-quality content rather than low-quality channels that generate a lot of traffic but don’t produce quality videos. So, if you want to increase your revenue from your YouTube videos, try to focus on high-quality content.
Your monetization method
Several monetization methods exist, including Subscription, advertising, affiliate marketing, paid search, and sponsorships. Each monetization method requires a slightly different setup and management, resulting in different revenue.
The country you are in
It is important to know that in some countries, making money off YouTube is extremely difficult. For example, in certain countries, monetizing your videos is impossible without using illegal methods, which will get you into legal trouble.
Some other factors, e.g., it’s worth comparing the RPM of your country and other countries, different rules and prices of YouTube Ads depending on your country.
Bonus tip: Increase YouTube earnings with a powerful video editing software
Are you tired of your boring, run-of-the-mill videos? Are you looking for ways to improve your YouTube earnings? Then let’s look at some of the best editing software to help create your next great content.
Wondershare Filmora is a powerful yet easy-to-use video editing software that makes it easier than ever to make awesome videos. Filmora offers more than 50 cutting-edge tools and effects that make it easier to edit any media source, including videos, photos, and music and share the result in just minutes. Use Filmora’s powerful features like keyframing, motion tracking, split screen, instant mode, VFX, templates etc., to make your video stand out.
Here’s a demo of the software, editing YouTube Shorts:
Free Download For Win 7 or later(64-bit)
Free Download For macOS 10.14 or later
Step1 Open Filmora 11 application.
Step2 Open Project Settings
Step3 Change Aspect Ratio, Resolution, and Frame rate
Step4 Drag video to the timeline
Step5 Right-click and select Crop to Fit
Step6 Right-Click again and select Crop and Zoom
Step7 Adjust the frame
Step8 Lastly Export you file
Bottom line
People want to watch a video when searching for the answers to a question. The best videos are designed to help users accomplish their specific goals while providing them with something they can take away and use for themselves. You need to put up good videos to keep viewers coming back.
To do that, use the game-changing Filmora 11 (mentioned in the article) to create engaging YouTube videos and amaze your audience. Slowly but surely, your audience will increase and then all the guidance in this article will help you easily analyze, calculate and increase your YouTube revenue.
Free Download For Win 7 or later(64-bit)
Free Download For macOS 10.14 or later
- Title: "2024 Approved Harmonize Platforms Uploading Twitch Content for YouTube Audience"
- Author: Joseph
- Created at : 2024-05-31 13:51:29
- Updated at : 2024-06-01 13:51:29
- Link: https://youtube-stream.techidaily.com/2024-approved-harmonize-platforms-uploading-twitch-content-for-youtube-audience/
- License: This work is licensed under CC BY-NC-SA 4.0.
