
:max_bytes(150000):strip_icc()/SmartLuggage_MaurizioPesce-5a49851522fa3a003693996c.jpg)
"2024 Approved From Live Logging to Global Broadcasting Mastery Through Mindfulness"
From Live Logging to Global Broadcasting: Mastery Through Mindfulness
The Dos and Don’ts of Daily Vlogging

Richard Bennett
Oct 26, 2023• Proven solutions
If you are making videos on YouTube, you’ll have come to a point where you feel daring enough to take on the ultimate challenge: daily vlogging.
You might have been inspired by other creators on YouTube or you might have heard of VEDA: Vlog every day April (or August). You might have also watched some videos from influencers telling you that the ruthless YouTube algorithm demands daily content if you aspire to grow an audience.
There are many reasons why you may want to try your hand at becoming a daily vlogger, but here are 3 motivating reasons to conquer your vlogging fears and get started.
Bonus Tip-The Best Daily Vlog Maker- Wondershare Filmora
Vlogging is an art and people use vlogging to upload videos daily to their YouTube channel. This is natural if you are recording videos daily, you will need a tool like Wondershare Filmora to edit your videos with precision. To make your task easy, Wondershare Filmora has all the features and effects that are required to edit a daily vlog video that you can upload directly from Filmora itself. You can make use of features like add text, background music, filters & effects, etc if you are a daily vlogger as it would help you a lot in making the video look professional in less time.


Why Daily Vlog Anyways?
Build discipline: Like exercising and eating healthy, you have to commit to it and do it regularly in order to see any lasting results. Vlogging is the same. However, if you’re a creator, making videos whenever you feel like it and want to give yourself a kick in the behind, daily vlogging is a practice that will keep you accountable. You have to do it every day. No excuses.
Practice more: How do the best become the best? They practice… every day. If what you want to do is become the greatest video creator you can be, make the best videos you can make, and build the largest following that you can, then let daily vlogging be your boot camp to reach those goals.
Please the YouTube algorithm: It’s true, YouTube wants to see that you are consistently posting fresh content. Every new video you upload will have a day or two to impress the algorithm, this metric is often referred to as view velocity . YouTube will give your video a lift, suggesting it to new viewers, if they see that it is being enjoyed. By publishing daily, you increase your chances of attracting more viewers.
Now that you know the benefits, how should you approach it?
The Dos and Don’ts of Daily Vlogging
1. Do Get Some Experience First
If you are starting out on YouTube, as in, you made one or two videos make sure you can vlog weekly for a few months before moving to daily. You wouldn’t run a marathon without training; you can hurt yourself if you do. Have an idea of what you are getting yourself into, otherwise, it can burn you out and ruin the joy of video creation for you completely.
2. Don’t Film Everything
Having a daily vlog does not mean always having the camera on. Every minute you film is a minute of footage you will have to watch later, a minute you will have to decide whether to cut from your final video. Every second of recorded footage is multiplied in the editing room and it would be impossible for you to meet your daily deadline if you have too much. The key is to start editing as you film, that way, you only film what you need. It doesn’t hurt to have extra footage, but being excessive can waste your time and add little to the final product.
3. Do Plan Out Your Day (Not Your Night)
Knowing where you need to go, who you are going to see and talk to, where you are going to have lunch, which route you are going to take home, and any other occurrences that can happen during the day will greatly increase your chances of success. A day is long and can be made longer when you have a video on your mind. Wouldn’t it be nice to save some of your decision making energy by having it all planned out? And if you are worried that over planning will reduce serendipitous moments that you want, don’t, your day won’t always go as planned… that’s just life.
Additionally, avoid filming at night. It will become a major stress to your health. Filming at night means pulling all-nighters to publish the next day, and then repeating that daily (nightly).
4. Don’t Spend too Long On a Script… Or Your Video
The beauty of daily vlog is to speak your mind and show your personality, not to perform a Shakespearean sonnet by heart. You shouldn’t try to memorize a whole script every day. That would be brutal! What you can have is an outline of the key points you want to hit, certain things you want to say, convey, or record to tell your story, knowing where you want certain cuts to happen helps too, but don’t workshop it too long, because tomorrow will be another show and done is better than perfect.
5. Do Use Templates, Presets, Hotkeys, and Shortcuts
Any chance you have to cut down on your editing time, use it. This means creating and properly storing templates of visuals you want to incorporate into your video. This means adding presets for effects that you feel you would use again. This means learning the editing hotkeys so you can streamline your process. Here are Filmora’s hotkeys .
6. Don’t Forget to Label Your Content
Staying organized is so important, especially as you begin to accumulate more and more footage. It might seem tedious initially, but this good habit can save you a lot of wasted hours later on when you need to find that specific shot that you swore you had…
7. Do Have A Goal
Have an idea of how long you are going to be going daily. Will it be one month, two months, or a year? Or will it be until you reach a certain amount of views, subscribers, or watch time? While it might feel liberating to venture into the great unknown without a clear destination, having a goal will allow you to keep motivated even when times are hard. After all, once you’ve hit your goal and still feel like there is more fuel in you, keep daily vlogging. There is no better feeling than exceeding your own expectations.
8. Don’t Worry About Equipment (But Be Aware of Bad Audio)
You’ve heard it before: you don’t need anything fancy to be a vlogger. If you are looking to increase your toolbox, we have a helpful YouTube gear starter guide for you. But look at it this way, there will be days when you realized that you forgot to charge the battery on your camera or that you left your tripod at home. Don’t abandon the whole project simply because you don’t have what you need.
The important thing is to film, tell a story, edit, and upload. You can do all that on your smartphone or computer webcam if you have to, so don’t let your equipment or lack thereof break your streak. If there is one thing you should put attention on is audio, if you don’t have excellent gear, try to avoid filming in loud places, such as construction sites, dance halls, or highway overpasses.
9. Do Bring a Camera With You Everywhere
Although you shouldn’t worry about your equipment, it is still a good habit to carry your camera with you everywhere. From the moment you wake up to the moment you go to sleep you are a daily vlogger, you never know when something will happen. Always be prepared. Your camera is to you, as a gun is to a soldier. It’s what sets you apart from all the civilians, so keep it close at hand.
10. Don’t Neglect Your Health
Earlier I compared daily vlogging to running a marathon, and like a marathon, there is a point where you need to be aware of yourself. You want to push yourself, but you don’t want to overdo it to a point where you damage your physical or mental health. Only you know when you have gone too far. If you feel like daily vlogging is ruining your life and the goal you set for yourself isn’t something you desire anymore, ask yourself: can I take a week off and decide if video creating is something I want to continue?
11. Do Watch Other Daily Vloggers
By seeing how other YouTubers have done daily vlogs, you can get ideas, see what aspect of their videos you like or dislike, and learn from their presentation, content, and community engagement. By watching daily vloggers, you can also start interacting with their content as well. It is always easier to stay motivated when you have support. By watching and reaching out to the daily vloggers you enjoy, you can build a network of people who are going through the same journey as you.
12. Don’t Forget About Your Audience
Remember that in the end, you are creating videos for someone else to enjoy. Even though you might be doing the daily vlog for yourself, if you want your viewers to return every day, you have to have an overall mission for your project. Is your message one that is aimed to motivate or do you want to document a journey? Don’t create your content in a vacuum, ask your viewers for feedback so you know how to improve.
Embarking on your daily vlogging adventure is not one to take lightly, but after 1 month, 1 season, or 1 year, you will be able to look back and see all that you have accomplished and feel proud. With the advice from this article, you can properly prepare yourself and enjoy each step of the process. Don’t overthink it, have fun!
Are you thinking of starting your daily vlog? Let us know what’s stopping you from the comments.
Richard Bennett
Richard Bennett is a writer and a lover of all things video.
Follow @Richard Bennett
Richard Bennett
Oct 26, 2023• Proven solutions
If you are making videos on YouTube, you’ll have come to a point where you feel daring enough to take on the ultimate challenge: daily vlogging.
You might have been inspired by other creators on YouTube or you might have heard of VEDA: Vlog every day April (or August). You might have also watched some videos from influencers telling you that the ruthless YouTube algorithm demands daily content if you aspire to grow an audience.
There are many reasons why you may want to try your hand at becoming a daily vlogger, but here are 3 motivating reasons to conquer your vlogging fears and get started.
Bonus Tip-The Best Daily Vlog Maker- Wondershare Filmora
Vlogging is an art and people use vlogging to upload videos daily to their YouTube channel. This is natural if you are recording videos daily, you will need a tool like Wondershare Filmora to edit your videos with precision. To make your task easy, Wondershare Filmora has all the features and effects that are required to edit a daily vlog video that you can upload directly from Filmora itself. You can make use of features like add text, background music, filters & effects, etc if you are a daily vlogger as it would help you a lot in making the video look professional in less time.
Why Daily Vlog Anyways?
Build discipline: Like exercising and eating healthy, you have to commit to it and do it regularly in order to see any lasting results. Vlogging is the same. However, if you’re a creator, making videos whenever you feel like it and want to give yourself a kick in the behind, daily vlogging is a practice that will keep you accountable. You have to do it every day. No excuses.
Practice more: How do the best become the best? They practice… every day. If what you want to do is become the greatest video creator you can be, make the best videos you can make, and build the largest following that you can, then let daily vlogging be your boot camp to reach those goals.
Please the YouTube algorithm: It’s true, YouTube wants to see that you are consistently posting fresh content. Every new video you upload will have a day or two to impress the algorithm, this metric is often referred to as view velocity . YouTube will give your video a lift, suggesting it to new viewers, if they see that it is being enjoyed. By publishing daily, you increase your chances of attracting more viewers.
Now that you know the benefits, how should you approach it?
The Dos and Don’ts of Daily Vlogging
1. Do Get Some Experience First
If you are starting out on YouTube, as in, you made one or two videos make sure you can vlog weekly for a few months before moving to daily. You wouldn’t run a marathon without training; you can hurt yourself if you do. Have an idea of what you are getting yourself into, otherwise, it can burn you out and ruin the joy of video creation for you completely.
2. Don’t Film Everything
Having a daily vlog does not mean always having the camera on. Every minute you film is a minute of footage you will have to watch later, a minute you will have to decide whether to cut from your final video. Every second of recorded footage is multiplied in the editing room and it would be impossible for you to meet your daily deadline if you have too much. The key is to start editing as you film, that way, you only film what you need. It doesn’t hurt to have extra footage, but being excessive can waste your time and add little to the final product.
3. Do Plan Out Your Day (Not Your Night)
Knowing where you need to go, who you are going to see and talk to, where you are going to have lunch, which route you are going to take home, and any other occurrences that can happen during the day will greatly increase your chances of success. A day is long and can be made longer when you have a video on your mind. Wouldn’t it be nice to save some of your decision making energy by having it all planned out? And if you are worried that over planning will reduce serendipitous moments that you want, don’t, your day won’t always go as planned… that’s just life.
Additionally, avoid filming at night. It will become a major stress to your health. Filming at night means pulling all-nighters to publish the next day, and then repeating that daily (nightly).
4. Don’t Spend too Long On a Script… Or Your Video
The beauty of daily vlog is to speak your mind and show your personality, not to perform a Shakespearean sonnet by heart. You shouldn’t try to memorize a whole script every day. That would be brutal! What you can have is an outline of the key points you want to hit, certain things you want to say, convey, or record to tell your story, knowing where you want certain cuts to happen helps too, but don’t workshop it too long, because tomorrow will be another show and done is better than perfect.
5. Do Use Templates, Presets, Hotkeys, and Shortcuts
Any chance you have to cut down on your editing time, use it. This means creating and properly storing templates of visuals you want to incorporate into your video. This means adding presets for effects that you feel you would use again. This means learning the editing hotkeys so you can streamline your process. Here are Filmora’s hotkeys .
6. Don’t Forget to Label Your Content
Staying organized is so important, especially as you begin to accumulate more and more footage. It might seem tedious initially, but this good habit can save you a lot of wasted hours later on when you need to find that specific shot that you swore you had…
7. Do Have A Goal
Have an idea of how long you are going to be going daily. Will it be one month, two months, or a year? Or will it be until you reach a certain amount of views, subscribers, or watch time? While it might feel liberating to venture into the great unknown without a clear destination, having a goal will allow you to keep motivated even when times are hard. After all, once you’ve hit your goal and still feel like there is more fuel in you, keep daily vlogging. There is no better feeling than exceeding your own expectations.
8. Don’t Worry About Equipment (But Be Aware of Bad Audio)
You’ve heard it before: you don’t need anything fancy to be a vlogger. If you are looking to increase your toolbox, we have a helpful YouTube gear starter guide for you. But look at it this way, there will be days when you realized that you forgot to charge the battery on your camera or that you left your tripod at home. Don’t abandon the whole project simply because you don’t have what you need.
The important thing is to film, tell a story, edit, and upload. You can do all that on your smartphone or computer webcam if you have to, so don’t let your equipment or lack thereof break your streak. If there is one thing you should put attention on is audio, if you don’t have excellent gear, try to avoid filming in loud places, such as construction sites, dance halls, or highway overpasses.
9. Do Bring a Camera With You Everywhere
Although you shouldn’t worry about your equipment, it is still a good habit to carry your camera with you everywhere. From the moment you wake up to the moment you go to sleep you are a daily vlogger, you never know when something will happen. Always be prepared. Your camera is to you, as a gun is to a soldier. It’s what sets you apart from all the civilians, so keep it close at hand.
10. Don’t Neglect Your Health
Earlier I compared daily vlogging to running a marathon, and like a marathon, there is a point where you need to be aware of yourself. You want to push yourself, but you don’t want to overdo it to a point where you damage your physical or mental health. Only you know when you have gone too far. If you feel like daily vlogging is ruining your life and the goal you set for yourself isn’t something you desire anymore, ask yourself: can I take a week off and decide if video creating is something I want to continue?
11. Do Watch Other Daily Vloggers
By seeing how other YouTubers have done daily vlogs, you can get ideas, see what aspect of their videos you like or dislike, and learn from their presentation, content, and community engagement. By watching daily vloggers, you can also start interacting with their content as well. It is always easier to stay motivated when you have support. By watching and reaching out to the daily vloggers you enjoy, you can build a network of people who are going through the same journey as you.
12. Don’t Forget About Your Audience
Remember that in the end, you are creating videos for someone else to enjoy. Even though you might be doing the daily vlog for yourself, if you want your viewers to return every day, you have to have an overall mission for your project. Is your message one that is aimed to motivate or do you want to document a journey? Don’t create your content in a vacuum, ask your viewers for feedback so you know how to improve.
Embarking on your daily vlogging adventure is not one to take lightly, but after 1 month, 1 season, or 1 year, you will be able to look back and see all that you have accomplished and feel proud. With the advice from this article, you can properly prepare yourself and enjoy each step of the process. Don’t overthink it, have fun!
Are you thinking of starting your daily vlog? Let us know what’s stopping you from the comments.
Richard Bennett
Richard Bennett is a writer and a lover of all things video.
Follow @Richard Bennett
Finding YT Comments: Tips for Desktop, iPhone, Android Users
How to Find Your Comments on YouTube?
Richard Bennett
Mar 27, 2024• Proven solutions
Have you ever felt worried about any YouTube comment that you published long ago, and later you realized that it was a mistake? Or, do you want to know what comments did you post and when? If so, YouTube offers a simple way of finding your past remarks, and making any changes to them if need be.
That said, the following sections teach you how to find your YouTube comments on a desktop or laptop computer, and also on a mobile device if you are a gadget freak.
- Part 1: How to Find Comments You’ve Posted on YouTube?
- Part 2: How to Find All YouTube Comments Your Channel Has Received?
- Part 3: How to Find Someone’s YouTube Comments by User Name?
- Part 4: How to Edit and Reply to YouTube Comments?
- Part 5: How to Moderate YouTube Comments?
- Part 6: Tips for Writing Good YouTube Comments
Part 1: How to Find All the Comments You’ve Posted on YouTube?
YouTube allows you to post comments on any video only if you are signed in to your Google account while browsing the streaming platform. Because of this, the portal is able to keep a record of your activities, thus enabling you to track all your comments, and take necessary action such as deleting or modifying them as required.
You can learn how to find all the comments you have posted on YouTube while using your preferred device by following the instructions given below:
1. Find Your YouTube Comments on a Desktop or Laptop Computer
Step 1: Sign In to Your YouTube Account
Launch your favorite web browser, go to the YouTube page, click SIGN IN from the top-right corner, and follow the on-screen instructions to enter your credentials and sign in to your Google/YouTube account.
Step 2: Get to the History Page
Click the Menu button from the top-left corner of the page, and then click History from the categories available in the navigation bar in the left.

Step 3: Access/View Your Past Comments
Click Comments from the right of the History page to view all the comments that you have posted earlier.

2. Find Your YouTube Comments on an iPhone
Unfortunately, at the time of this writing, the YouTube app for iOS doesn’t have the feature to view your comments history. However, there is a workaround where you can use a web browser on your smartphone to get this done. The process that is given below explains how to view your past YouTube comments on an iPhone:
Step 1: Sign In to Your YouTube Account on an Internet Browser
Launch your favorite web browser on your iPhone (Safari, the default one, is used here for illustration), go to https://m.youtube.com , tap the profile icon from the top-right corner, tap Sign in from the menu that appears, and follow the on-screen instructions to use your Google account credentials to sign in to YouTube.
Step 2: Access the Desktop Version of YouTube
Tap the More Options icon from the top-left corner of the browser, and then tap Request Desktop Website from the menu that appears to access the desktop version of YouTube on your iPhone.

Step 3: View Your Past YouTube Comments
Tap the Menu icon from the top-left corner of the YouTube page, and tap History from the menu that appears. On the History page, tap Comments from the right pane to view/access your YouTube comments that you posted in the past.

3. Find Your YouTube Comments on an Android Smartphone
As it is with iOS, the YouTube app for Android doesn’t allow you to view your comments history either. However, the workaround of using a web browser works pretty well on Android smartphones too, but with a few tweaks. The process of doing so is given below:
Step 1: Use a Web Browser to Sign In to Your YouTube Account
Launch Google Chrome on your Android smartphone (you can use any other web browser of your choice), and go to https://m.youtube.com . Notice how the interface automatically changes to the desktop version. Note: If the desktop version of the website isn’t visible, you can tap the More button (with three vertical dots) from the top-right corner of the browser, and check the Desktop site box.
Next, tap SIGN IN from the top-right corner of the YouTube page, enter your Google account credentials in the box available on the Sign in screen, enter your password when prompted, and sign in to your YouTube account.
Step 2: Choose a Web Browser (for Confirmation)
When the confirmation box pops up at the bottom, choose your preferred web browser, and tap the frequency of its usage for accessing YouTube. For instance, choose Chrome and Just once to use Google Chrome to access YouTube only for this session.
Step 3: View/Access Your Past YouTube Comments
Once you are signed in to your account, tap the Menu icon from the top-left corner of the YouTube page, and tap History from the menu that appears. When the History page opens up, tap Comments from the right pane to view and/or access your past YouTube comments.
Part 2: How to Find All YouTube Comments Your Channel Has Received?
If you own a YouTube channel and have posted several videos there, it is likely that you also have received a decent number of comments. Usually, these remarks are pretty helpful as they tell you how to improve your production quality, and what your audience prefers to watch in the future. Therefore, it is imperative to learn how to find all the comments that your YouTube channel has received, and the process given below explains exactly that:
1. Find Your Channel’s YouTube Comments on a Desktop or Laptop Computer
You can use your favorite web browser on a PC to easily find all the comments that the videos on your YouTube channel have received as long as you are signed in to your Google account. The step-by-step instructions on how this can be done are given below:
Step 1: Go to the Your videos Page
Open your favorite Internet browser, go to https://www.youtube.com , and sign in to your YouTube account as explained in the previous sections. Next, click the Menu icon from the top-left corner of the YouTube homepage, and click Your videos from the menu that appears.

Step 2: View the Comments
Make sure that the Uploads tab is selected on the Channel content window, and check the number under the Comments column of each video to see how many comments that particular film has received. You can click the number for any video to view its comments.

Step 3: Hide or Hold a Comment for Approval
Click the More icon from the right of the comment you want to moderate, and click Hide user from channel or Always approve comments from this user to hide the comments from the selected user or keep their comments on hold until you review and approve them respectively.

Note: To view all comments received on your YouTube channel, go to the Comments tab under YouTube Studio, and you will find all Channel comments & mentions.
2. Find Your Channel’s YouTube Comments on a Mobile App
This process is comparatively simpler than the previous one as all that you need to do is download the YT Studio app, and access a central location where all the comments for all the videos can be viewed. The process is given below:
Step 1: Obtain a Mobile App
Go to App Store or Google Play Store, and search and download the YT Studio app on your iPhone or Android smartphone (iPhone X is used here for illustration).
Step 2: View/Access All the Comments
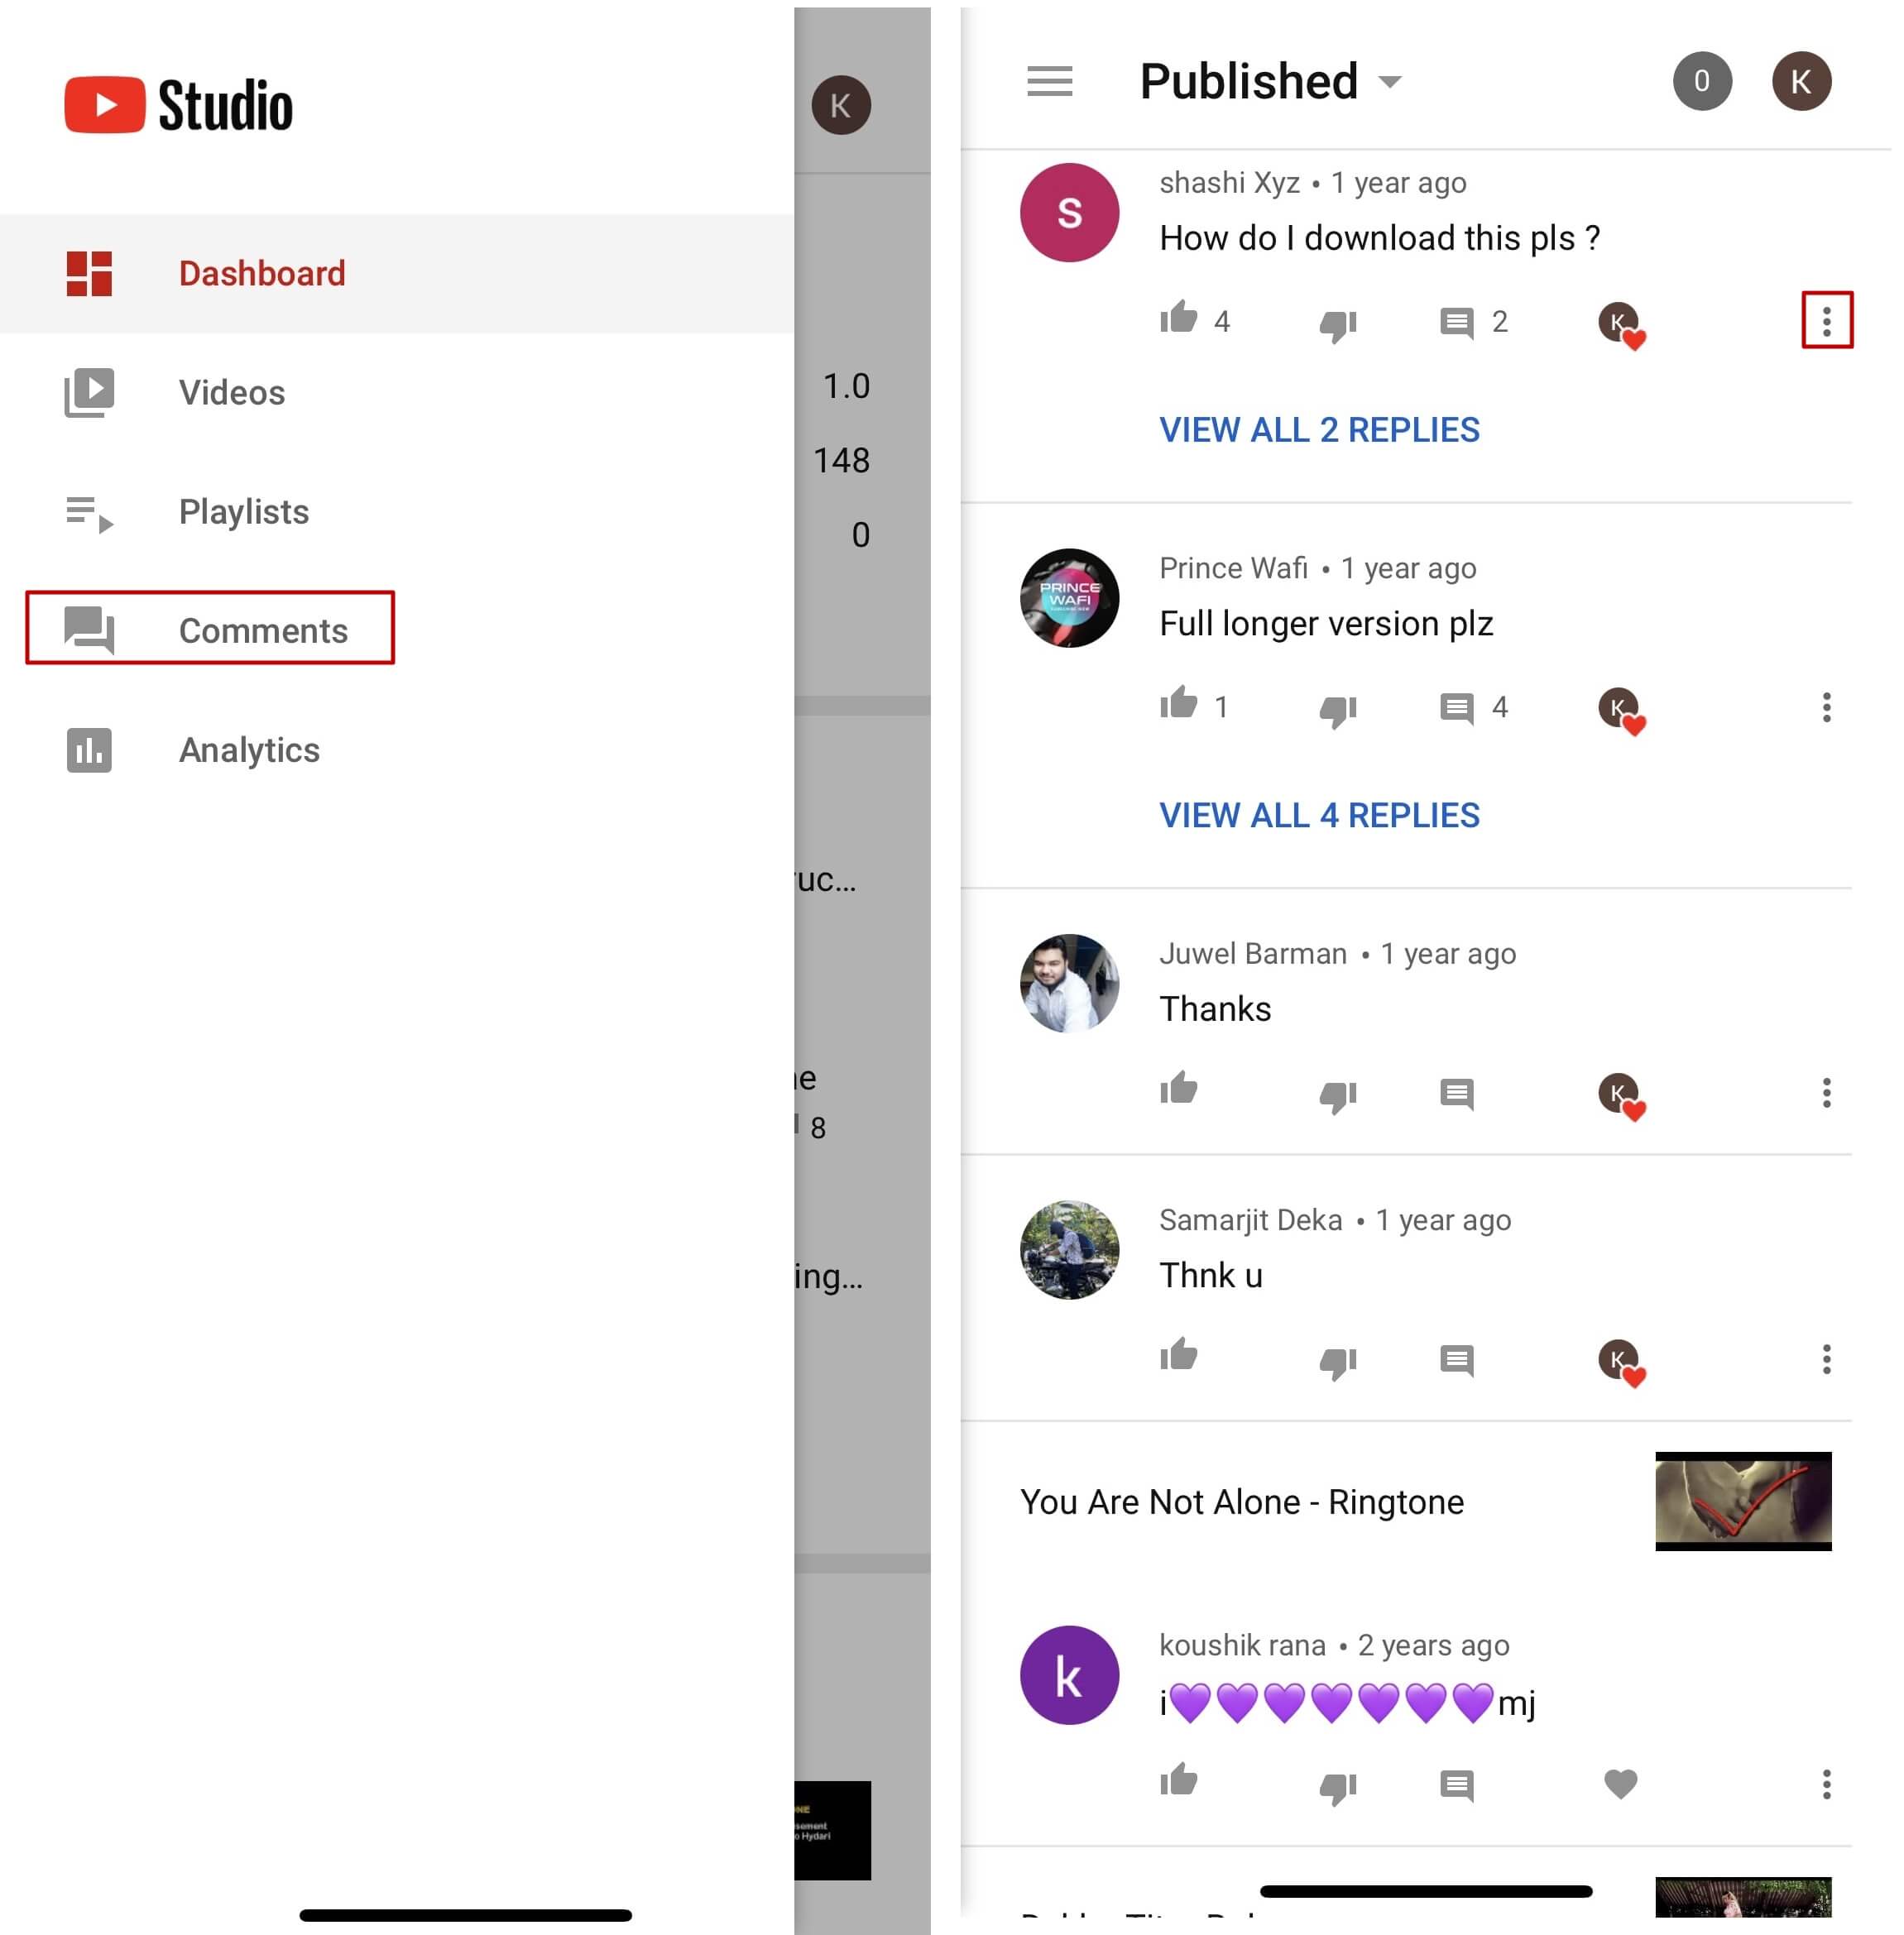
Launch the YT Studio app, and sign in to your YouTube account. Tap the Menu icon from the top-left corner of the interface, and tap Comments from the menu to view all the published comments for all the videos that you have received on your YouTube channel.
Step 3: Hide Users and View Held Comments
Tap the More button from the right of an inappropriate comment, and tap Hide user from channel from the menu that comes up. In addition, you can tap the More button next to Published from the top, and tap Held for review from the box that pops up to view the comments that are waiting for your approval.
Note: Unfortunately, you cannot hold the comments for approval using the YT Studio app. As a workaround, you can follow the procedure given earlier to access the desktop version of YouTube on your smartphone, and then use the method explained in the previous section to get this done. However, it is recommended that you do all such sensitive tasks on a laptop or desktop computer to avoid any errors.
Part 3: Find Someone’s YouTube Comments by User Name
If any of your YouTube videos has thousands of comments and you need to find a particular one from a specific user, checking each remark manually would be an extremely time-consuming and tedious task. Therefore, it is a good idea to let an efficient application do the job for you.
One program, a Google Chrome extension called YCS – YouTube Comment Search to be precise, can help you with this. All you are required to do is, install the extension, go to the video, and search the comment by the name of the user. The step-by-step instructions on how this can be done are given below:
Step 1: Install YCS – YouTube Comment Search
Launch Google Chrome on your desktop or laptop computer, search for YCS – YouTube Comment Search, click Add to Chrome, and click Add extension on the notification box that pops up to install the YCS – YouTube Comment Search extension on your instance of Google Chrome.
Step 2: Load All Comments
Go to your or any other’s YouTube video, and click Load All from the top-right corner of the YouTube Comment Search panel that is present under the description box to allow YCS to scan all the comments the video has received.

Step 3: Search Comments from a Particular User
Choose Comments from the search type drop-down list, enter the name of the user in question in the Search box, and click Search to fetch all their comments on the video.

Part 4: How to Edit and Reply to YouTube Comments?
Editing an existing YouTube comment that you have posted earlier, or replying to the one published by someone else is simple. The process is given below:
Step 1: Edit an Existing Comment
Use any of the methods explained above to locate your YouTube comment that you want to edit. Next, click the More icon from the right of the comment, click Edit from the menu, make the required changes to the text, and click SAVE.
Step 2: Reply to a Comment
Locate the comment that you want to reply to, click REPLY from under the comment, type your text in the available field, and click REPLY.

Part 5: How to Moderate YouTube Comments?
If you publish videos on YouTube that may put some impact on people’s lifestyle, you are likely to face criticism quite often. Therefore, you might want to moderate all your comments before they become visible to the audience so as not to spread negativity among the mass. Fortunately, YouTube helps you get this done easily, and the instructions that teach you the process are given below:
Step 1: Get to Your Channel’s Settings Box
Sign in to your YouTube account, click the Menu icon from the top-left corner of the homepage, and click Your videos from the menu that appears.
From the bottom of the navigation bar on the left of the YouTube Studio page, click Settings to open the channel’s Settings box.
Step 2: Moderate YouTube Comments
Go to the Community category from the left pane, and go to the Defaults tab from the right. Next, choose Hide all comments for review from the Comments on your new videos drop-down list, and click SAVE from the bottom-right corner of the box to moderate all YouTube comments that your new videos receive from this point onward.

Part 6: Tips for Writing Good YouTube Comments
While posting a comment on a YouTube video, it is imperative to keep a few things in mind. Some important tips that might come in handy in this regard are suggested below:
- Make your comment as relevant to the video as you possibly can
- Avoid using harsh language or slangs to maintain decency
- Be genuine while leaving feedback. However, make sure to choose polite words while typing a comment
- In case you want to add some suggestions, make sure to be humble
- Ignore the replies with inappropriate content
FAQs About YouTube Comments
Q1) Why can’t I see the comments I posted?
A: If you cannot see your comments, this could be because the owner or moderator has configured the channel or the video to hold all the comments for review before they are visible on YouTube.
In such a case, you are advised to wait for the authorized person to approve your remark before it is published. Another possibility is that the moderator/owner has added you to the ‘hidden users’ list due to some reason. Even in this case, your comment won’t be visible until you are removed from that list.
Q2) I have enabled ‘Notify me’ about comments and other activity on my channel or videos, but can’t see the comments on my video. Why?
A: You won’t be able to view the unpublished comments or those from the users you have added to the ‘hidden’ list. To fix this problem, you may want to disable moderation from your channel or the videos, and also unhide the users. The processes of both these configurations are explained in detail in the above sections.
Richard Bennett
Richard Bennett is a writer and a lover of all things video.
Follow @Richard Bennett
Richard Bennett
Mar 27, 2024• Proven solutions
Have you ever felt worried about any YouTube comment that you published long ago, and later you realized that it was a mistake? Or, do you want to know what comments did you post and when? If so, YouTube offers a simple way of finding your past remarks, and making any changes to them if need be.
That said, the following sections teach you how to find your YouTube comments on a desktop or laptop computer, and also on a mobile device if you are a gadget freak.
- Part 1: How to Find Comments You’ve Posted on YouTube?
- Part 2: How to Find All YouTube Comments Your Channel Has Received?
- Part 3: How to Find Someone’s YouTube Comments by User Name?
- Part 4: How to Edit and Reply to YouTube Comments?
- Part 5: How to Moderate YouTube Comments?
- Part 6: Tips for Writing Good YouTube Comments
Part 1: How to Find All the Comments You’ve Posted on YouTube?
YouTube allows you to post comments on any video only if you are signed in to your Google account while browsing the streaming platform. Because of this, the portal is able to keep a record of your activities, thus enabling you to track all your comments, and take necessary action such as deleting or modifying them as required.
You can learn how to find all the comments you have posted on YouTube while using your preferred device by following the instructions given below:
1. Find Your YouTube Comments on a Desktop or Laptop Computer
Step 1: Sign In to Your YouTube Account
Launch your favorite web browser, go to the YouTube page, click SIGN IN from the top-right corner, and follow the on-screen instructions to enter your credentials and sign in to your Google/YouTube account.
Step 2: Get to the History Page
Click the Menu button from the top-left corner of the page, and then click History from the categories available in the navigation bar in the left.
Step 3: Access/View Your Past Comments
Click Comments from the right of the History page to view all the comments that you have posted earlier.
2. Find Your YouTube Comments on an iPhone
Unfortunately, at the time of this writing, the YouTube app for iOS doesn’t have the feature to view your comments history. However, there is a workaround where you can use a web browser on your smartphone to get this done. The process that is given below explains how to view your past YouTube comments on an iPhone:
Step 1: Sign In to Your YouTube Account on an Internet Browser
Launch your favorite web browser on your iPhone (Safari, the default one, is used here for illustration), go to https://m.youtube.com , tap the profile icon from the top-right corner, tap Sign in from the menu that appears, and follow the on-screen instructions to use your Google account credentials to sign in to YouTube.
Step 2: Access the Desktop Version of YouTube
Tap the More Options icon from the top-left corner of the browser, and then tap Request Desktop Website from the menu that appears to access the desktop version of YouTube on your iPhone.
Step 3: View Your Past YouTube Comments
Tap the Menu icon from the top-left corner of the YouTube page, and tap History from the menu that appears. On the History page, tap Comments from the right pane to view/access your YouTube comments that you posted in the past.
3. Find Your YouTube Comments on an Android Smartphone
As it is with iOS, the YouTube app for Android doesn’t allow you to view your comments history either. However, the workaround of using a web browser works pretty well on Android smartphones too, but with a few tweaks. The process of doing so is given below:
Step 1: Use a Web Browser to Sign In to Your YouTube Account
Launch Google Chrome on your Android smartphone (you can use any other web browser of your choice), and go to https://m.youtube.com . Notice how the interface automatically changes to the desktop version. Note: If the desktop version of the website isn’t visible, you can tap the More button (with three vertical dots) from the top-right corner of the browser, and check the Desktop site box.
Next, tap SIGN IN from the top-right corner of the YouTube page, enter your Google account credentials in the box available on the Sign in screen, enter your password when prompted, and sign in to your YouTube account.
Step 2: Choose a Web Browser (for Confirmation)
When the confirmation box pops up at the bottom, choose your preferred web browser, and tap the frequency of its usage for accessing YouTube. For instance, choose Chrome and Just once to use Google Chrome to access YouTube only for this session.
Step 3: View/Access Your Past YouTube Comments
Once you are signed in to your account, tap the Menu icon from the top-left corner of the YouTube page, and tap History from the menu that appears. When the History page opens up, tap Comments from the right pane to view and/or access your past YouTube comments.
Part 2: How to Find All YouTube Comments Your Channel Has Received?
If you own a YouTube channel and have posted several videos there, it is likely that you also have received a decent number of comments. Usually, these remarks are pretty helpful as they tell you how to improve your production quality, and what your audience prefers to watch in the future. Therefore, it is imperative to learn how to find all the comments that your YouTube channel has received, and the process given below explains exactly that:
1. Find Your Channel’s YouTube Comments on a Desktop or Laptop Computer
You can use your favorite web browser on a PC to easily find all the comments that the videos on your YouTube channel have received as long as you are signed in to your Google account. The step-by-step instructions on how this can be done are given below:
Step 1: Go to the Your videos Page
Open your favorite Internet browser, go to https://www.youtube.com , and sign in to your YouTube account as explained in the previous sections. Next, click the Menu icon from the top-left corner of the YouTube homepage, and click Your videos from the menu that appears.
Step 2: View the Comments
Make sure that the Uploads tab is selected on the Channel content window, and check the number under the Comments column of each video to see how many comments that particular film has received. You can click the number for any video to view its comments.
Step 3: Hide or Hold a Comment for Approval
Click the More icon from the right of the comment you want to moderate, and click Hide user from channel or Always approve comments from this user to hide the comments from the selected user or keep their comments on hold until you review and approve them respectively.
Note: To view all comments received on your YouTube channel, go to the Comments tab under YouTube Studio, and you will find all Channel comments & mentions.
2. Find Your Channel’s YouTube Comments on a Mobile App
This process is comparatively simpler than the previous one as all that you need to do is download the YT Studio app, and access a central location where all the comments for all the videos can be viewed. The process is given below:
Step 1: Obtain a Mobile App
Go to App Store or Google Play Store, and search and download the YT Studio app on your iPhone or Android smartphone (iPhone X is used here for illustration).
Step 2: View/Access All the Comments
Launch the YT Studio app, and sign in to your YouTube account. Tap the Menu icon from the top-left corner of the interface, and tap Comments from the menu to view all the published comments for all the videos that you have received on your YouTube channel.
Step 3: Hide Users and View Held Comments
Tap the More button from the right of an inappropriate comment, and tap Hide user from channel from the menu that comes up. In addition, you can tap the More button next to Published from the top, and tap Held for review from the box that pops up to view the comments that are waiting for your approval.
Note: Unfortunately, you cannot hold the comments for approval using the YT Studio app. As a workaround, you can follow the procedure given earlier to access the desktop version of YouTube on your smartphone, and then use the method explained in the previous section to get this done. However, it is recommended that you do all such sensitive tasks on a laptop or desktop computer to avoid any errors.
Part 3: Find Someone’s YouTube Comments by User Name
If any of your YouTube videos has thousands of comments and you need to find a particular one from a specific user, checking each remark manually would be an extremely time-consuming and tedious task. Therefore, it is a good idea to let an efficient application do the job for you.
One program, a Google Chrome extension called YCS – YouTube Comment Search to be precise, can help you with this. All you are required to do is, install the extension, go to the video, and search the comment by the name of the user. The step-by-step instructions on how this can be done are given below:
Step 1: Install YCS – YouTube Comment Search
Launch Google Chrome on your desktop or laptop computer, search for YCS – YouTube Comment Search, click Add to Chrome, and click Add extension on the notification box that pops up to install the YCS – YouTube Comment Search extension on your instance of Google Chrome.
Step 2: Load All Comments
Go to your or any other’s YouTube video, and click Load All from the top-right corner of the YouTube Comment Search panel that is present under the description box to allow YCS to scan all the comments the video has received.
Step 3: Search Comments from a Particular User
Choose Comments from the search type drop-down list, enter the name of the user in question in the Search box, and click Search to fetch all their comments on the video.
Part 4: How to Edit and Reply to YouTube Comments?
Editing an existing YouTube comment that you have posted earlier, or replying to the one published by someone else is simple. The process is given below:
Step 1: Edit an Existing Comment
Use any of the methods explained above to locate your YouTube comment that you want to edit. Next, click the More icon from the right of the comment, click Edit from the menu, make the required changes to the text, and click SAVE.
Step 2: Reply to a Comment
Locate the comment that you want to reply to, click REPLY from under the comment, type your text in the available field, and click REPLY.
Part 5: How to Moderate YouTube Comments?
If you publish videos on YouTube that may put some impact on people’s lifestyle, you are likely to face criticism quite often. Therefore, you might want to moderate all your comments before they become visible to the audience so as not to spread negativity among the mass. Fortunately, YouTube helps you get this done easily, and the instructions that teach you the process are given below:
Step 1: Get to Your Channel’s Settings Box
Sign in to your YouTube account, click the Menu icon from the top-left corner of the homepage, and click Your videos from the menu that appears.
From the bottom of the navigation bar on the left of the YouTube Studio page, click Settings to open the channel’s Settings box.
Step 2: Moderate YouTube Comments
Go to the Community category from the left pane, and go to the Defaults tab from the right. Next, choose Hide all comments for review from the Comments on your new videos drop-down list, and click SAVE from the bottom-right corner of the box to moderate all YouTube comments that your new videos receive from this point onward.
Part 6: Tips for Writing Good YouTube Comments
While posting a comment on a YouTube video, it is imperative to keep a few things in mind. Some important tips that might come in handy in this regard are suggested below:
- Make your comment as relevant to the video as you possibly can
- Avoid using harsh language or slangs to maintain decency
- Be genuine while leaving feedback. However, make sure to choose polite words while typing a comment
- In case you want to add some suggestions, make sure to be humble
- Ignore the replies with inappropriate content
FAQs About YouTube Comments
Q1) Why can’t I see the comments I posted?
A: If you cannot see your comments, this could be because the owner or moderator has configured the channel or the video to hold all the comments for review before they are visible on YouTube.
In such a case, you are advised to wait for the authorized person to approve your remark before it is published. Another possibility is that the moderator/owner has added you to the ‘hidden users’ list due to some reason. Even in this case, your comment won’t be visible until you are removed from that list.
Q2) I have enabled ‘Notify me’ about comments and other activity on my channel or videos, but can’t see the comments on my video. Why?
A: You won’t be able to view the unpublished comments or those from the users you have added to the ‘hidden’ list. To fix this problem, you may want to disable moderation from your channel or the videos, and also unhide the users. The processes of both these configurations are explained in detail in the above sections.
Richard Bennett
Richard Bennett is a writer and a lover of all things video.
Follow @Richard Bennett
- Title: "2024 Approved From Live Logging to Global Broadcasting Mastery Through Mindfulness"
- Author: Joseph
- Created at : 2024-05-31 13:43:37
- Updated at : 2024-06-01 13:43:37
- Link: https://youtube-stream.techidaily.com/2024-approved-from-live-logging-to-global-broadcasting-mastery-through-mindfulness/
- License: This work is licensed under CC BY-NC-SA 4.0.
