:max_bytes(150000):strip_icc()/is-hulu-down-or-is-it-you-4802265-2779bb5af85946508569c56d3c726346.jpg)
"2024 Approved From Barely There to Top Rated The Youtube Growth Arc"
From Barely There to Top Rated: The Youtube Growth Arc
Case Study: How to Grow on YouTube to Have Millions of Subs

Shanoon Cox
Oct 26, 2023• Proven solutions
You’ve probably heard of stories about individuals who managed to find financial success on YouTube. If your dream is to make money on YouTube it’s important to remember that regular people are doing it.
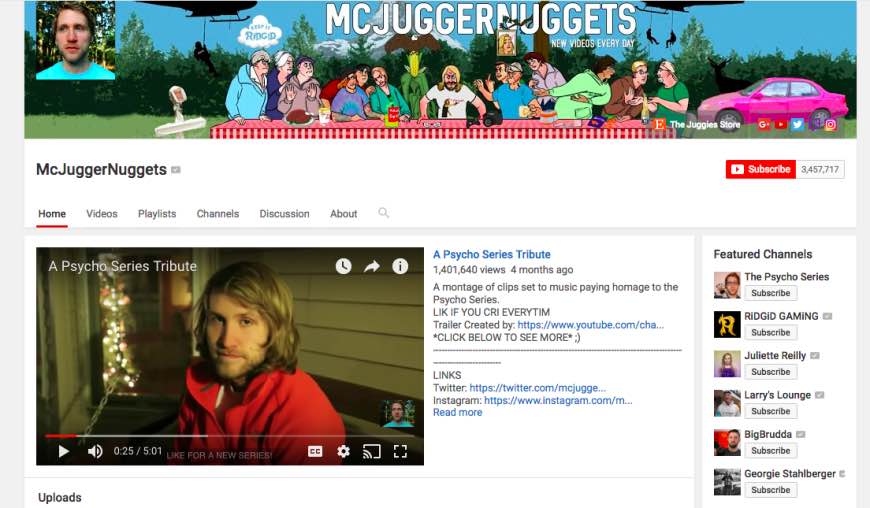
Jesse Ridgway is the owner of the vlog McJuggerNuggets , which has grown to over 3.4 million subscribers. He makes enough money to live off of YouTube alone. Here is a case study of how he made his first $10,000 on YouTube:
Case Study of McJuggerNuggets
Jesse was one of the earliest YouTubers. He started his channel on December 9, 2006. Jesse never guessed that he would make enough money to live off of the videos he was creating. Here are some of the ways that he monetized his channel:
AdSense
Monetization of videos through AdSense is one of the easiest ways that you can start to profit off your videos. Registering for a Google AdSense can earn you between $0.30 and $2.00 per thousand ad impressions (an impression is a click, not a view). How much you make per ad impression depends on a lot of things, including the time of year. There are good months for advertising revenue and bad months. December is usually the hottest month for making money through AdSense because of the holiday shopping season. Some of the other months where you can see huge profits include September for back-to-school, June, and March.
More popular channels get higher paying ads, and it is harder to earn ad revenue in popular vlogging genres (i.e. gaming) than in more obscure niches.
Target the Right Demographic
Some of the largest YouTuber success stories are creators who primarily target younger audiences. Others target men or women specifically. Think about who you want your audience to be and make videos that will appeal to them.
Multichannel Networks
Once you hit a certain level of subscribership and views you will start getting invited to MCMs. In some cases, multichannel network promotions could entitle you to discounts on merchandise and products. Be careful: a multichannel network will always want you to sign a contract, and they will take over your AdSense account.
Social Blade
This site will provide details about your subscription count, which of your videos has the best watch time, and more. It will give you a good impression of what you should be including in your videos and how you can make more money from your channel.
Uploading Your Videos at the Right Time
Uploading videos at the right time will make sure that you are on the front page of recently uploaded videos when people are let out of school or taking a break from work. This will earn you lots of views. Set an upload time for all of your videos each day and stick to that schedule.
Check out Webinars
Looking into webinars and videos of what other popular YouTube experts have done will help you model their success.
Collaborate with Other YouTubers
When you create a collab video you and your partner are each introduced to each other’s subscribers.
Keep Quality Up
Putting time and effort into every upload will ensure that you won’t lose subscribers or viewers because you got a bit lazy.
Do Follow-Up Videos
If you have a particular video that has a lot of views, you may want to consider creating follow-up videos. This can be a great way to generate lots of views.
Complete Regular Research
Regular research into your target market will help you to create the trendiest new content.
Don’t Get Discouraged
Timing and luck are definitely two of the biggest factors in becoming a success on YouTube. If you are willing to keep working and don’t get discouraged you will eventually earn profits.
Edit Your Videos with High-Quality Video Editor


Shanoon Cox
Shanoon Cox is a writer and a lover of all things video.
Follow @Shanoon Cox
Shanoon Cox
Oct 26, 2023• Proven solutions
You’ve probably heard of stories about individuals who managed to find financial success on YouTube. If your dream is to make money on YouTube it’s important to remember that regular people are doing it.
Jesse Ridgway is the owner of the vlog McJuggerNuggets , which has grown to over 3.4 million subscribers. He makes enough money to live off of YouTube alone. Here is a case study of how he made his first $10,000 on YouTube:
Case Study of McJuggerNuggets
Jesse was one of the earliest YouTubers. He started his channel on December 9, 2006. Jesse never guessed that he would make enough money to live off of the videos he was creating. Here are some of the ways that he monetized his channel:
AdSense
Monetization of videos through AdSense is one of the easiest ways that you can start to profit off your videos. Registering for a Google AdSense can earn you between $0.30 and $2.00 per thousand ad impressions (an impression is a click, not a view). How much you make per ad impression depends on a lot of things, including the time of year. There are good months for advertising revenue and bad months. December is usually the hottest month for making money through AdSense because of the holiday shopping season. Some of the other months where you can see huge profits include September for back-to-school, June, and March.
More popular channels get higher paying ads, and it is harder to earn ad revenue in popular vlogging genres (i.e. gaming) than in more obscure niches.
Target the Right Demographic
Some of the largest YouTuber success stories are creators who primarily target younger audiences. Others target men or women specifically. Think about who you want your audience to be and make videos that will appeal to them.
Multichannel Networks
Once you hit a certain level of subscribership and views you will start getting invited to MCMs. In some cases, multichannel network promotions could entitle you to discounts on merchandise and products. Be careful: a multichannel network will always want you to sign a contract, and they will take over your AdSense account.
Social Blade
This site will provide details about your subscription count, which of your videos has the best watch time, and more. It will give you a good impression of what you should be including in your videos and how you can make more money from your channel.
Uploading Your Videos at the Right Time
Uploading videos at the right time will make sure that you are on the front page of recently uploaded videos when people are let out of school or taking a break from work. This will earn you lots of views. Set an upload time for all of your videos each day and stick to that schedule.
Check out Webinars
Looking into webinars and videos of what other popular YouTube experts have done will help you model their success.
Collaborate with Other YouTubers
When you create a collab video you and your partner are each introduced to each other’s subscribers.
Keep Quality Up
Putting time and effort into every upload will ensure that you won’t lose subscribers or viewers because you got a bit lazy.
Do Follow-Up Videos
If you have a particular video that has a lot of views, you may want to consider creating follow-up videos. This can be a great way to generate lots of views.
Complete Regular Research
Regular research into your target market will help you to create the trendiest new content.
Don’t Get Discouraged
Timing and luck are definitely two of the biggest factors in becoming a success on YouTube. If you are willing to keep working and don’t get discouraged you will eventually earn profits.
Edit Your Videos with High-Quality Video Editor
Shanoon Cox
Shanoon Cox is a writer and a lover of all things video.
Follow @Shanoon Cox
Your Step-By-Step Pathway to YouTube Video Enhancement
How To Upload Videos to YouTube [a Step-by-Step Guide]

Richard Bennett
Mar 27, 2024• Proven solutions
Want to learn how to upload videos to YouTube? Millions of people watch YouTube every day. Creating and posting YouTube videos can be a lot of fun, and if you get a lot of views and become popular you can also make money. YouTube videos are a creative way to connect with people all around the world.
These simple steps can assist you in learning how to upload YouTube videos from a desktop computer. You are going to Learn:
Edit YouTube with Powerful Video Editor
As a YouTuber, it is necessary to have an easy-to-use video editor, especially for beginners. Download Filmora for free and start your editing journey happily.
Part 1: Basic Rules You Need to Know Before Uploading
Clicking the ‘upload’ button is easy, but during the upload process, there are things you can do to help your video get views and maintain its quality. You should also keep an eye on the length and file size limits. The more basic things you need to consider carefully when you upload are the title, description, and tags of your video. These are part of what determines if and where your video comes up in people’s search results. There are also slightly more advanced video specs, like your video’s resolution, which will be helpful for you to understand as somebody who will be producing video content frequently. These sorts of specs will affect how long it takes your videos to upload and how much of the quality they maintain.
1. How Long Can my Video Be?
By default, your YouTube videos can only be 15 minutes long. You can post longer videos by going to the upload page and clicking on ‘Increase your Limit’ at the bottom. After you have followed the steps to verify your account you will be able to post videos that are a maximum of 11 hours long.
2. How Big a File Can I Upload?
Your file size was capped at 20GB, initially. If you follow the same steps for posting videos longer than 15 minutes then you can also increase your maximum file size to 128GB.
3. Other Basics
After you click the ‘upload’ button on YouTube you are taken to a page where you choose a category for your video and add a title, description, and tags. These are all important for getting hits so you should put some thought into them.
Title: Keep your title under 70 characters so none of it disappears into a ‘…’. The best titles make people curious or elicit an emotional response. Terms like ‘video’, ‘how-to’, and ‘tutorial’ are often typed into people’s searches so if they apply to your video it can help to put them in the title.
Description: A short synopsis of your video which includes your most important keyword. You have about three lines before your text is hidden by a ‘show more’ tab. If you are including the URL of your channel or other videos then you should make sure they are above the ‘show more’.
Tags: Use a lot of them. These are the keywords and terms people will be searching for when they find your video. YouTube will suggest some after you start adding. A quick way to find good keywords to use is to search for videos similar to yours and check out their tags. A while ago YouTube started hiding video tags by default but you can download a free, YouTube-certified, extension for Google Chrome which will allow you to see them from vidIQ.com.
4. Digging Deeper
To get your viewers to subscribe to your channel you will need to make sure your videos are not losing quality when you upload them. Here are some things to be aware of if you want your videos to look great on YouTube.
Resolution: the number of pixels in your image. For example when a video has a resolution of 1080p that means it has a grid of pixels that is 1920 x 1080. The more pixels you have the sharper your image.
Bitrate: Bitrate is a measurement of how compressed your file is, and the less compressed it is the more information there is per frame. Higher bitrates mean larger file sizes.
Your resolution and bitrate should complement each other. If you have a higher bitrate than is needed for your video’s resolution your file will be unnecessarily large. If your bitrate is too low for your resolution then you will not see the quality you expect.
YouTube has a list of recommended resolutions and bitrates at support.google.com/youtube/answer/1722171.
Aspect Ratio: the dimensions of your video, in terms of width and height. YouTube’s aspect ratio is 16:9, so your videos should also be 16:9. If they are not then you will get black bars on either side of your video after you upload it. The most common way that people end up with the wrong aspect ratio is by creating videos on their smartphones and holding them up and down instead of sideways.
Part 2: Steps to Upload Videos to YouTube
Uploading YouTube Video on Desktop:
1. Sign in to your YouTube account
2. Hit the upload button
3. Select your video type (Public, Private, Unlisted)
4. Manage the upload
5. Choose your thumbnail
Step 1: Sign in to your YouTube account
In order to upload videos to YouTube, the very first thing you need to do is sign in. The sign-in button is located at the top right corner of the YouTube homepage. If you have multiple accounts registered to one device, you will be asked to choose one to log in to.

Step 2: Hit the upload button
It is a simple step that you will have to follow right after you log in to YouTube. As soon as you enter YouTube, after using your Google account and password for login, you will find the upload button in the top right corner of the screen. Click on this button and it will take you to the dedicated upload page.
Step 3: Select your video type (Public, Private, Unlisted)
Choose your audience. If you wish to make your video available to everyone on YouTube, simply go to the privacy settings and choose the “Public” option from the drop-down menu.
If you do not want your video to be searchable, but still want to be able to easily share a link to it with your friends and family, choose the “Unlisted” option.
Those who wish to keep their video personal can choose the “Private” option from the drop-down menu. You can still share a private video with a limited number of people (as long as they have Google accounts).
The “Scheduled” option is available for choosing a future date and time to make the video available to viewers. Once you have selected your privacy level, simply upload your video from your device storage.

Step 4: Manage the upload
As soon as you have confirmed your video upload, you will find a progress bar on the screen. It will take some time depending on factors such as the resolution of the video and how long it is. In the meanwhile, you can write a title, description and add relevant tags for your video so that YouTube knows what search results to include it in and viewers can find it. Remember that YouTube is the second biggest search engine on the Internet, so take some time to optimize your keywords .
Step 5: Choose your thumbnail
Once your video uploading is complete, it is time to choose a creative thumbnail for your video. The system provides you with three options to choose from automatically, all of which will be screenshots from your video. It is usually better toupload your own custom thumbnail , as thumbnails are a very important factor in attracting viewers. Hit the “Done” button or use the “Publish” button to finalize your upload.
That’s how to upload a video on YouTube! Any questions?
Richard Bennett
Richard Bennett is a writer and a lover of all things video.
Follow @Richard Bennett
Richard Bennett
Mar 27, 2024• Proven solutions
Want to learn how to upload videos to YouTube? Millions of people watch YouTube every day. Creating and posting YouTube videos can be a lot of fun, and if you get a lot of views and become popular you can also make money. YouTube videos are a creative way to connect with people all around the world.
These simple steps can assist you in learning how to upload YouTube videos from a desktop computer. You are going to Learn:
Edit YouTube with Powerful Video Editor
As a YouTuber, it is necessary to have an easy-to-use video editor, especially for beginners. Download Filmora for free and start your editing journey happily.
Part 1: Basic Rules You Need to Know Before Uploading
Clicking the ‘upload’ button is easy, but during the upload process, there are things you can do to help your video get views and maintain its quality. You should also keep an eye on the length and file size limits. The more basic things you need to consider carefully when you upload are the title, description, and tags of your video. These are part of what determines if and where your video comes up in people’s search results. There are also slightly more advanced video specs, like your video’s resolution, which will be helpful for you to understand as somebody who will be producing video content frequently. These sorts of specs will affect how long it takes your videos to upload and how much of the quality they maintain.
1. How Long Can my Video Be?
By default, your YouTube videos can only be 15 minutes long. You can post longer videos by going to the upload page and clicking on ‘Increase your Limit’ at the bottom. After you have followed the steps to verify your account you will be able to post videos that are a maximum of 11 hours long.
2. How Big a File Can I Upload?
Your file size was capped at 20GB, initially. If you follow the same steps for posting videos longer than 15 minutes then you can also increase your maximum file size to 128GB.
3. Other Basics
After you click the ‘upload’ button on YouTube you are taken to a page where you choose a category for your video and add a title, description, and tags. These are all important for getting hits so you should put some thought into them.
Title: Keep your title under 70 characters so none of it disappears into a ‘…’. The best titles make people curious or elicit an emotional response. Terms like ‘video’, ‘how-to’, and ‘tutorial’ are often typed into people’s searches so if they apply to your video it can help to put them in the title.
Description: A short synopsis of your video which includes your most important keyword. You have about three lines before your text is hidden by a ‘show more’ tab. If you are including the URL of your channel or other videos then you should make sure they are above the ‘show more’.
Tags: Use a lot of them. These are the keywords and terms people will be searching for when they find your video. YouTube will suggest some after you start adding. A quick way to find good keywords to use is to search for videos similar to yours and check out their tags. A while ago YouTube started hiding video tags by default but you can download a free, YouTube-certified, extension for Google Chrome which will allow you to see them from vidIQ.com.
4. Digging Deeper
To get your viewers to subscribe to your channel you will need to make sure your videos are not losing quality when you upload them. Here are some things to be aware of if you want your videos to look great on YouTube.
Resolution: the number of pixels in your image. For example when a video has a resolution of 1080p that means it has a grid of pixels that is 1920 x 1080. The more pixels you have the sharper your image.
Bitrate: Bitrate is a measurement of how compressed your file is, and the less compressed it is the more information there is per frame. Higher bitrates mean larger file sizes.
Your resolution and bitrate should complement each other. If you have a higher bitrate than is needed for your video’s resolution your file will be unnecessarily large. If your bitrate is too low for your resolution then you will not see the quality you expect.
YouTube has a list of recommended resolutions and bitrates at support.google.com/youtube/answer/1722171.
Aspect Ratio: the dimensions of your video, in terms of width and height. YouTube’s aspect ratio is 16:9, so your videos should also be 16:9. If they are not then you will get black bars on either side of your video after you upload it. The most common way that people end up with the wrong aspect ratio is by creating videos on their smartphones and holding them up and down instead of sideways.
Part 2: Steps to Upload Videos to YouTube
Uploading YouTube Video on Desktop:
1. Sign in to your YouTube account
2. Hit the upload button
3. Select your video type (Public, Private, Unlisted)
4. Manage the upload
5. Choose your thumbnail
Step 1: Sign in to your YouTube account
In order to upload videos to YouTube, the very first thing you need to do is sign in. The sign-in button is located at the top right corner of the YouTube homepage. If you have multiple accounts registered to one device, you will be asked to choose one to log in to.
Step 2: Hit the upload button
It is a simple step that you will have to follow right after you log in to YouTube. As soon as you enter YouTube, after using your Google account and password for login, you will find the upload button in the top right corner of the screen. Click on this button and it will take you to the dedicated upload page.
Step 3: Select your video type (Public, Private, Unlisted)
Choose your audience. If you wish to make your video available to everyone on YouTube, simply go to the privacy settings and choose the “Public” option from the drop-down menu.
If you do not want your video to be searchable, but still want to be able to easily share a link to it with your friends and family, choose the “Unlisted” option.
Those who wish to keep their video personal can choose the “Private” option from the drop-down menu. You can still share a private video with a limited number of people (as long as they have Google accounts).
The “Scheduled” option is available for choosing a future date and time to make the video available to viewers. Once you have selected your privacy level, simply upload your video from your device storage.
Step 4: Manage the upload
As soon as you have confirmed your video upload, you will find a progress bar on the screen. It will take some time depending on factors such as the resolution of the video and how long it is. In the meanwhile, you can write a title, description and add relevant tags for your video so that YouTube knows what search results to include it in and viewers can find it. Remember that YouTube is the second biggest search engine on the Internet, so take some time to optimize your keywords .
Step 5: Choose your thumbnail
Once your video uploading is complete, it is time to choose a creative thumbnail for your video. The system provides you with three options to choose from automatically, all of which will be screenshots from your video. It is usually better toupload your own custom thumbnail , as thumbnails are a very important factor in attracting viewers. Hit the “Done” button or use the “Publish” button to finalize your upload.
That’s how to upload a video on YouTube! Any questions?
Richard Bennett
Richard Bennett is a writer and a lover of all things video.
Follow @Richard Bennett
Also read:
- [New] Digital Room for Screen Dance Duels
- [New] Pro Tools Review - Rising Above ShareX for 2024
- [Updated] Apple M1 Demystified The Tech Leap Forward for 2024
- 2024 Approved Explore Unrestricted Stock Content in Key 4 Video Channels
- 2024 Approved MP3 to YouTube Converter Upload MP3 to YouTube
- 2024 Approved Streamlining Your PS3 Recorded Experiences
- Explore These 6 Cutting-Edge Alternatives to OpenAI Sora – Start Using Them Without Paying a Penny!
- Gain Traction on YouTube - Surpass 10,000 Viewer Count for Affiliate Rewards for 2024
- In 2024, Financial Gains The Youtube Money Flow From 1M Views
- In 2024, The Pathway to Profit Enabling YouTuber Earnings via Mobile Devices
- In 2024, YouTube Monetization The New Rules Everyone Hates
- ITunes Connection Error with iPhone: Resolving the 'Value Is Missing' Issue
- Nailing the Desktop/Mobile YouTube Speed Control for 2024
- Ranking the Best Mac for Flawless GIF Saving for 2024
- Totan Banerjee, Author at Stellar Data Recovery Article - En
- What Pokémon Evolve with A Dawn Stone For OnePlus 12R? | Dr.fone
- Title: 2024 Approved From Barely There to Top Rated The Youtube Growth Arc
- Author: Joseph
- Created at : 2025-01-28 21:45:36
- Updated at : 2025-01-29 22:57:19
- Link: https://youtube-stream.techidaily.com/2024-approved-from-barely-there-to-top-rated-the-youtube-growth-arc/
- License: This work is licensed under CC BY-NC-SA 4.0.